728x90

이번 프로젝트는 spring legacy project의 프로젝트 세팅을 기록하고자 합니다.

제 블로그 모든 글은 개인 공부 차원에서 진행하는 포스팅이기에 정답과 상이할 수 있습니다.

Tool : Eclipse IDE

개발 환경 : [Spring Framework, Maven, Mybatis, MySQL]


< 목차 >

1. 이클립스 다운로드

2.톰캣 설치

3. 프로젝트 생성

4. spring 및 java 버전 설정

5. 톰캣 연결

6. 프로젝트 실행

7. 인코딩

8. 롬복 설치

9. mysql 및 mybatis 설정

참고 : 프로젝트 구조


1. 이클립스 및 STS 다운로드

1.1 이클립스 다운로드

해당 페이지에서 이클립스를 다운로드합니다.

https://www.eclipse.org/downloads/


Eclipse Downloads | The Eclipse Foundation

The Eclipse Foundation - home to a global community, the Eclipse IDE, Jakarta EE and over 415 open source projects, including runtimes, tools and frameworks.

www.eclipse.org

1.2 STS 다운로드

  • 이클립스 실행 후 상단 help - Eclipse Marketplace 로 진입합니다.


  • spring legacy project를 생성하기 위해서는 2번 째에 존재하는 Spring Tools를 설치해줍니다. (이미 설치되어 있어서 Installed라고 표시돼있습니다.)
  • 설치 후 restart now를 통해 이클립스를 재시작합니다.


2. 톰캣(WAS) 설치

프로젝트에서 사용할 WAS인 톰캣을 설치합니다.

Spring Boot에서는 내장 톰캣을 담고 있으나, Spring legacy project에서는 따로 추가해줘야 합니다.

https://tomcat.apache.org/download-80.cgi


Apache Tomcat® - Apache Tomcat 8 Software Downloads

Welcome to the Apache Tomcat® 8.x software download page. This page provides download links for obtaining the latest versions of Tomcat 8.x software, as well as links to the archives of older releases. Unsure which version you need? Specification versions

tomcat.apache.org

  • 해당 홈페이지에서 원하는 버전의 톰캣을 설치합니다. (저는 Tomcat 9을 설치하여 진행했습니다.)
  • 설치한 파일의 zip을 풀어줍니다.


3. Spring 프로젝트 생성

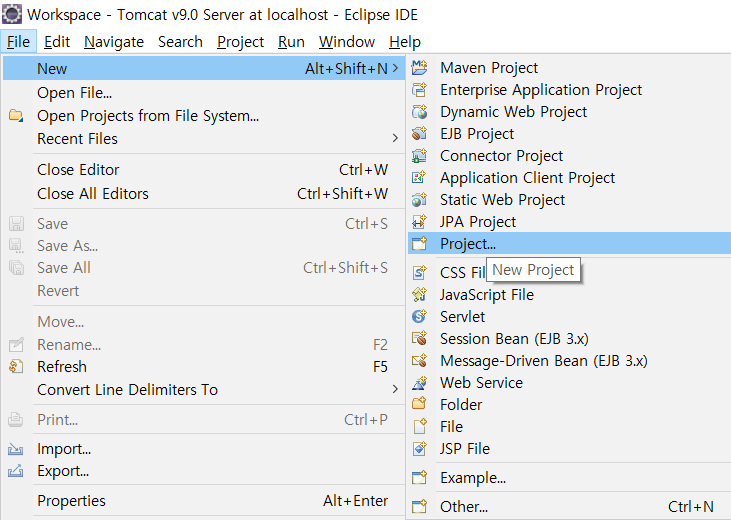
  • 프로젝트 생성을 위해 이클립스 상단 File - New - Project로 진입합니다.


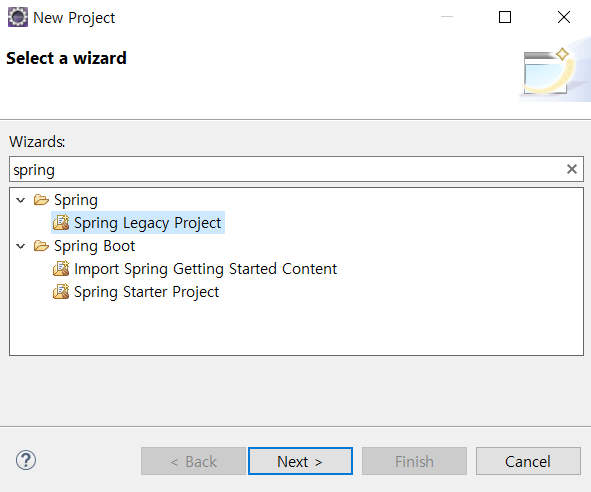
  • spring legacy project를 클릭하고 next


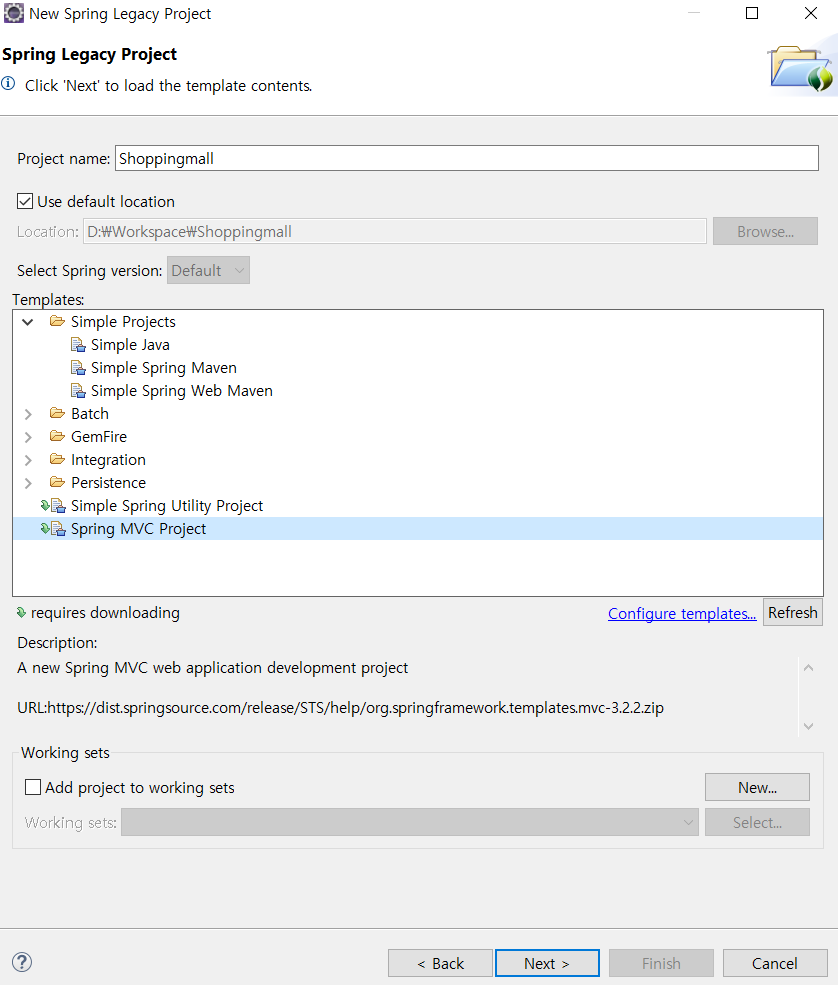
  • 프로젝트 명을 정하고 Spring MVC Project를 클릭하여 Next


  • 기본 패키지 이름을 입력하고 Finish


4. spring 및 java 버전 설정

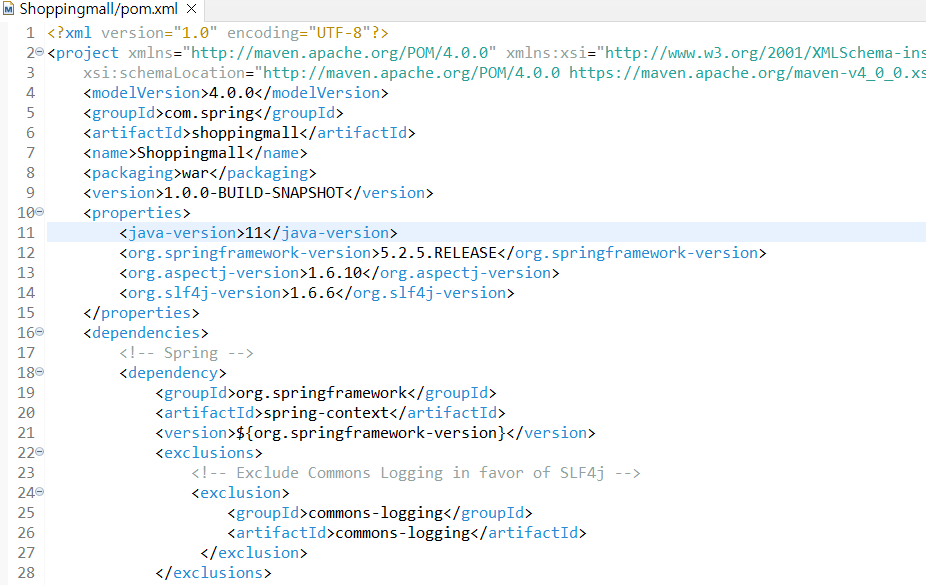
  • properties태그에 자신이 사용하고자 하는 Java 및 spring 버전으로 수정해줍니다.
  • 프로젝트 우클릭 후 properties 진입


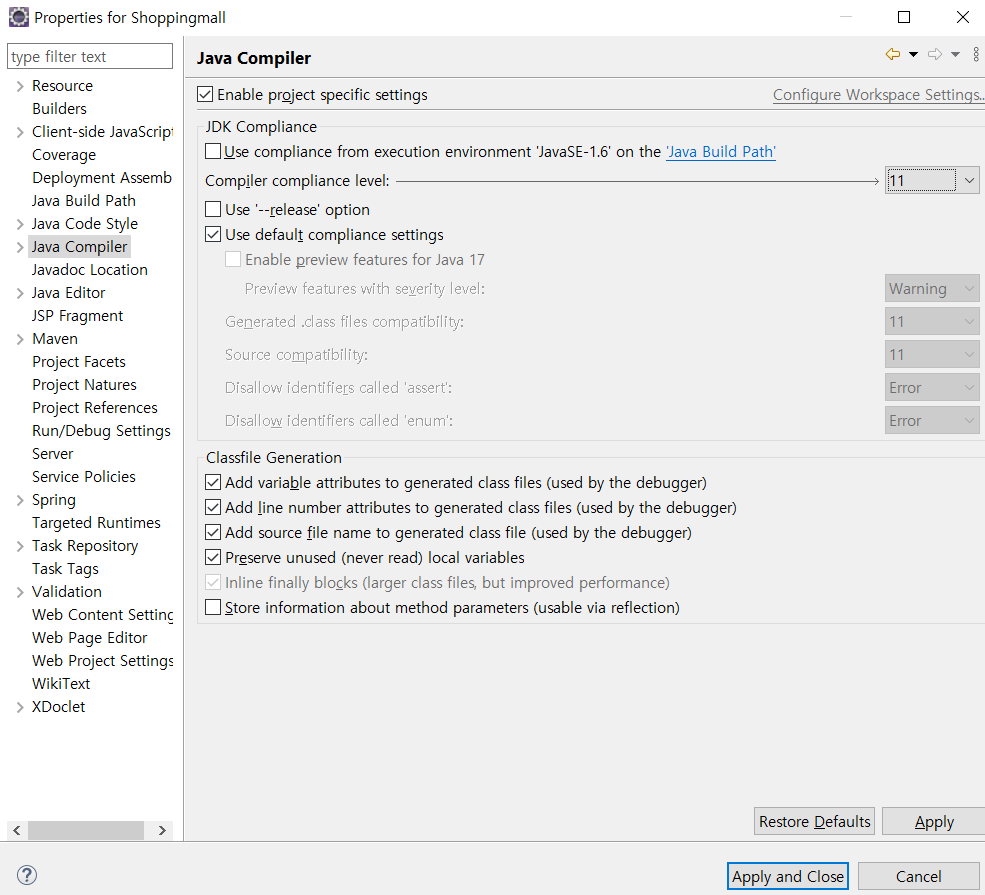
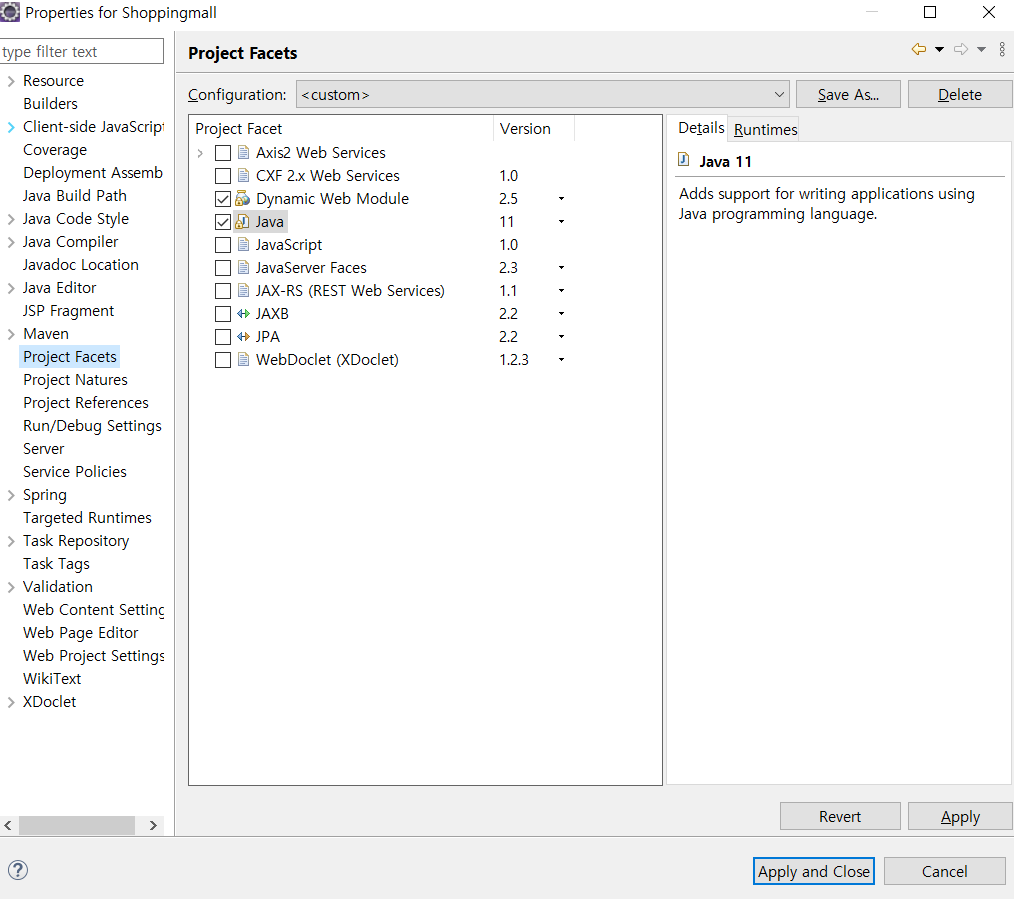
  • Java Compiler 및 Project Facets에서도 버전을 변경해줍니다.
  • 위 2가지 원하는 버전으로 수정 후 Apply 클릭


5. Tomcat 연결

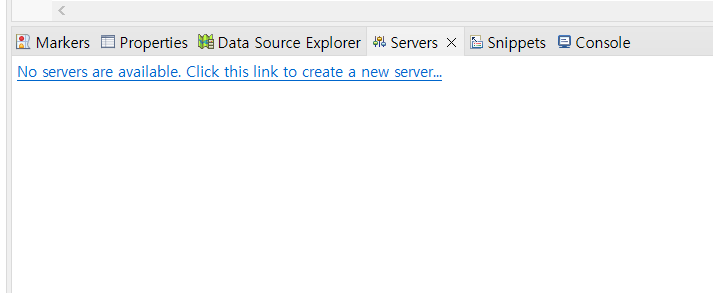
  • 이클립스 하단의 Server 탭을 클릭합니다. (위치는 개인에 따라 다를 수 있습니다.)
  • No servers...를 클릭하고 서버를 추가해주겠습니다.


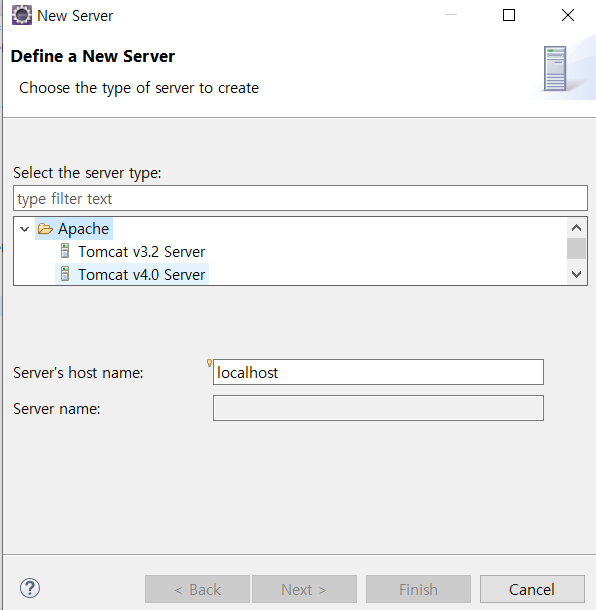
  • Apache - Tomcat (설치 버전)을 클릭하고 next


  • 압축 해제 후 톰캣 경로를 설정하고 next


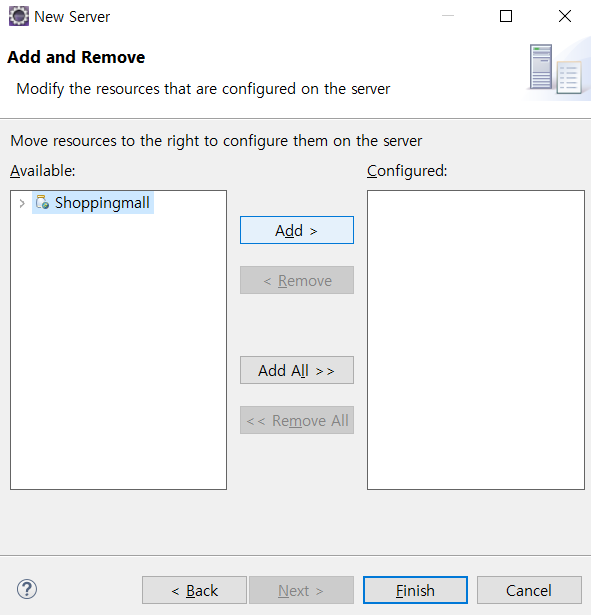
  • 생성한 프로젝트를 Add 후 Finish


  • Servers 탭에 톰캣이 추가된 것을 확인할 수 있습니다.
  • 더블클릭해서 들어가줍니다.


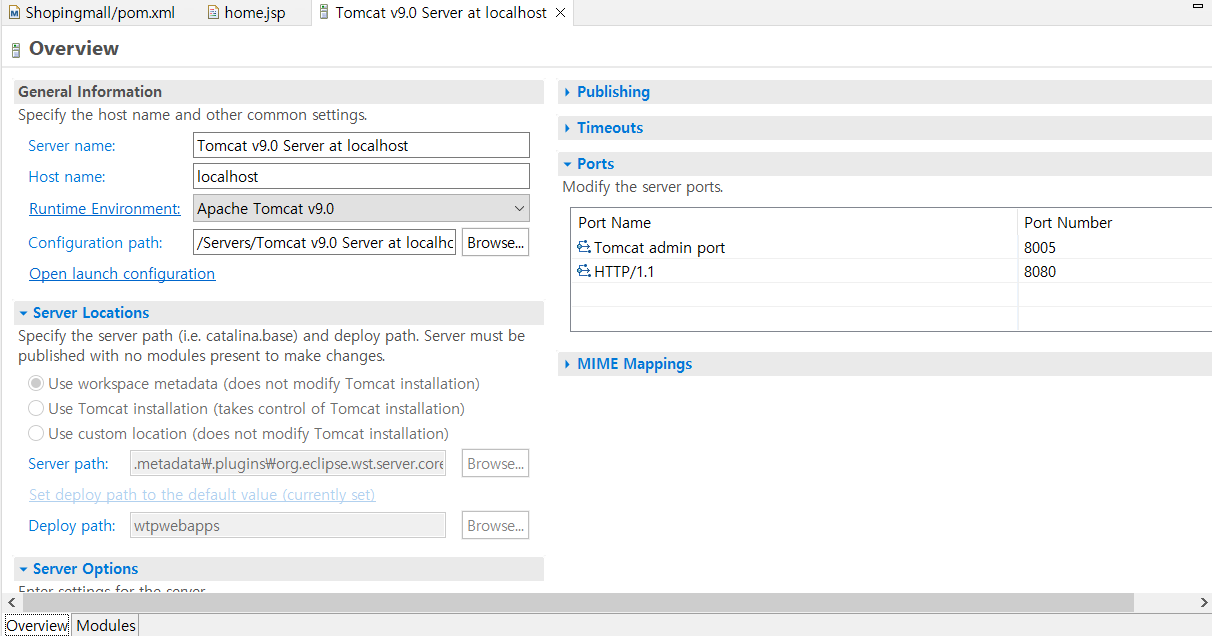
  • Overview 창이 보이는 것을 확인할 수 있으며, 8080port로 설정돼있는 것 보니 서버를 실행하면 localhost:8080으로 접속 가능하겠네요.


  • 여기서 톰캣이 실행하는 루트 경로를 설정해주겠습니다.
  • /shoppingmall로 설정되어있어 서버를 시작하고 웹에 접속하게 되면 localhost:8080 가 아닌 localhost:8080/shoppingmall 접속하게 됩니다.
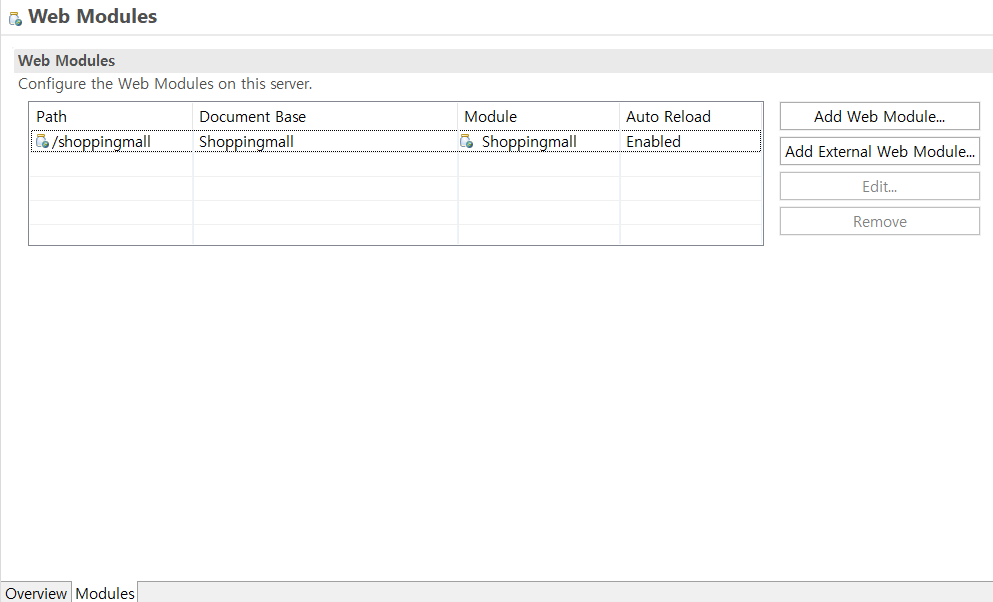
  • 하단 Overview탭에서 Modules탭으로 들어가서 생성한 패키지 목록을선택하고 Edit 클릭


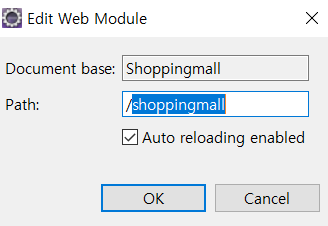
  • /shoppingmall을 /로 변경합니다.


6. 프로젝트 실행

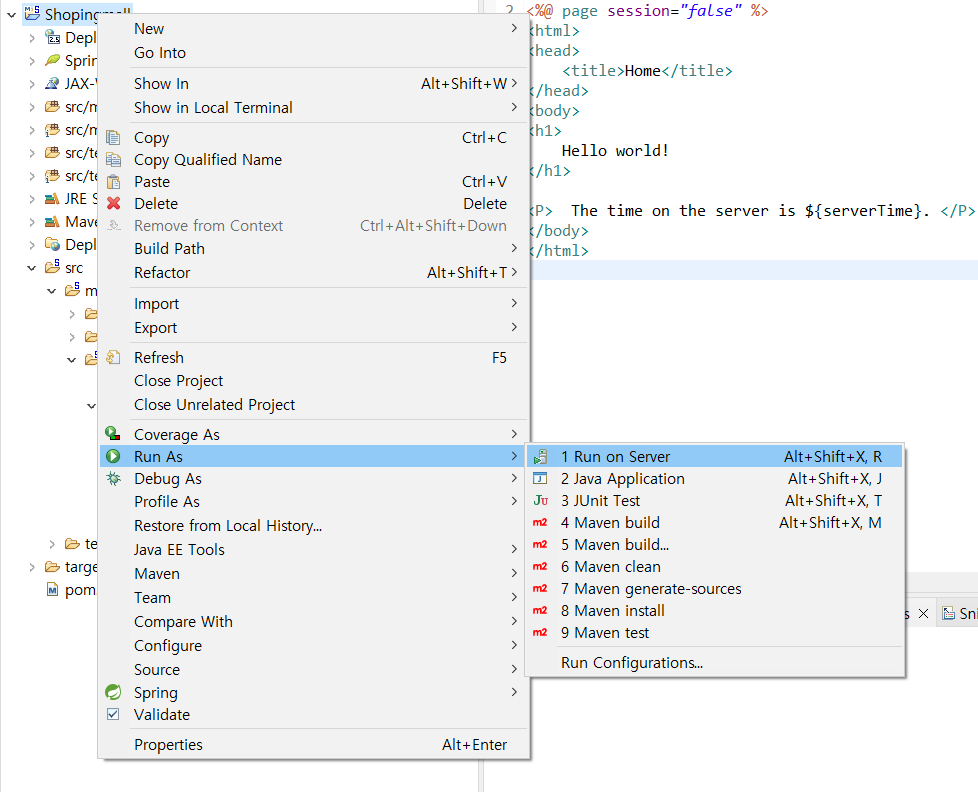
  • 패키지 우클릭 - Run as - Run on Sever 클릭해서 실행!


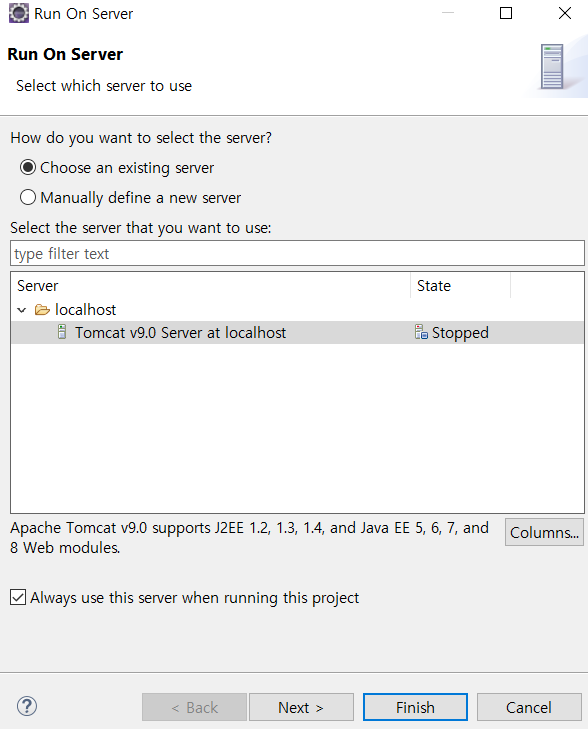
  • 실행 Tomcat 서버를 클릭하고 Finish


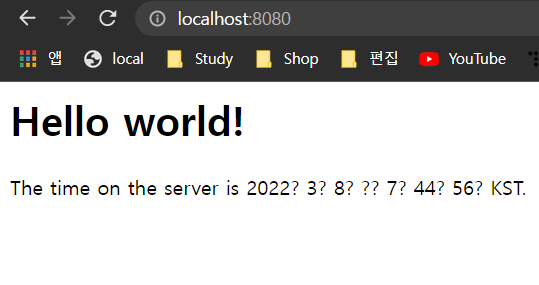
  • home.jsp가 화면에 출력되는 것을 확인할 수 있습니다. 그러나 한글이 깨지네요. 인코딩 설정을 해주겠습니다.


7. 인코딩 설정

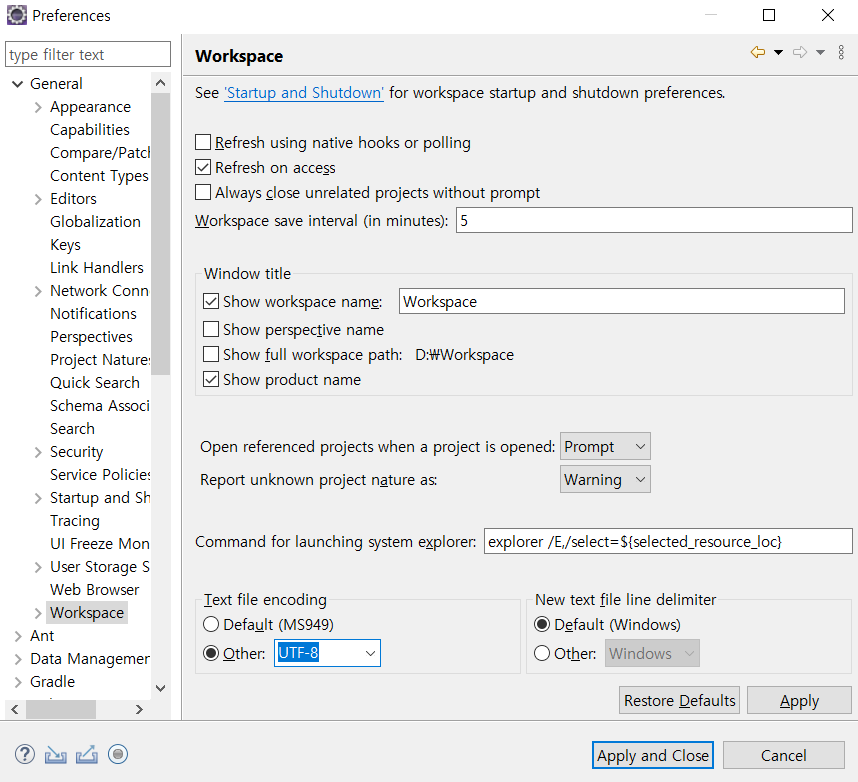
  • 이클립스 상단의 Window - Preferences - General 에서 그림과 같이 Other의 설정을 UTF-8로 변경


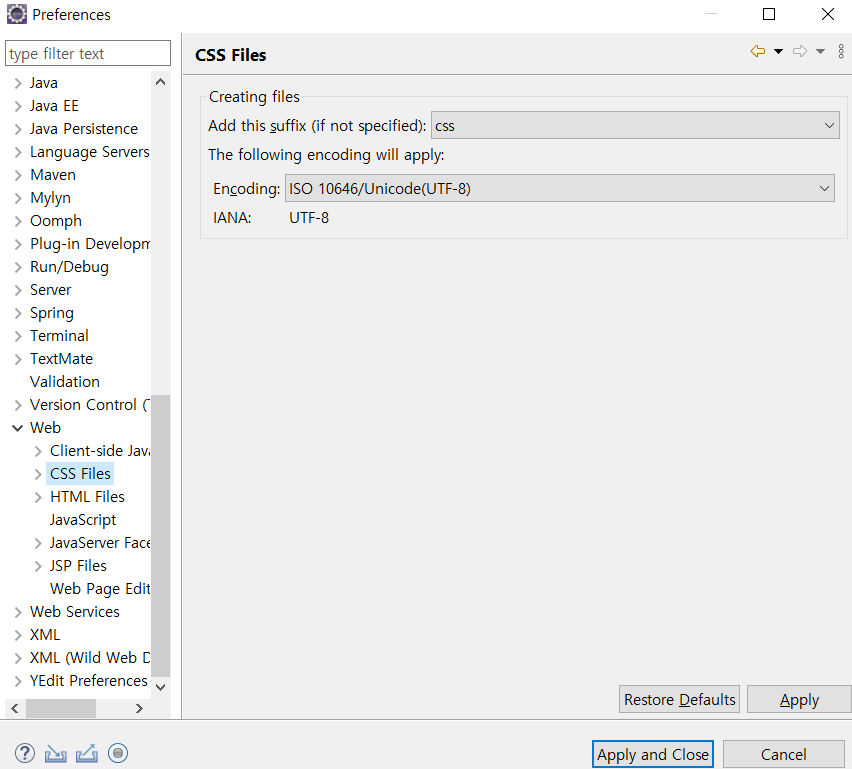
  • Web안의 CSSFiles, HTML Files, JSP Files의 인코딩을 UTF-8로 변경 후 Apply and Close!


	<filter>
		<filter-name>encodingFilter</filter-name>
		<filter-class>org.springframework.web.filter.CharacterEncodingFilter
		</filter-class>
		<init-param>
			<param-name>encoding</param-name>
			<param-value>UTF-8</param-value>
		</init-param>
		<init-param>
			<param-name>forceEncoding</param-name>
			<param-value>true</param-value>
		</init-param>
	</filter>
	<filter-mapping>
		<filter-name>encodingFilter</filter-name>
		<url-pattern>/*</url-pattern>
	</filter-mapping>
  • src - main - webapp - WEB-INF - web.xml의 </servlet-mapping> 아래에 다음의 인코딩 코드를 추가합니다.


다시 서버를 Restart 후 localhost:8080으로 접속하면?


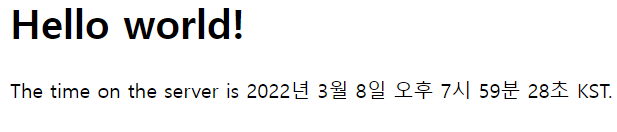
만약 그래도 한글이 깨진다면 jsp파일 상단에 다음 코드 유/무를 확인해주세요.

<%@ page contentType="text/html; charset=UTF-8" pageEncoding="UTF-8" language="java" %>


** 추가 (이클립스 빌드 시 코드 자동 저장)

  • Preferences - General - Workspace - Build에서 Save auto...를 체크


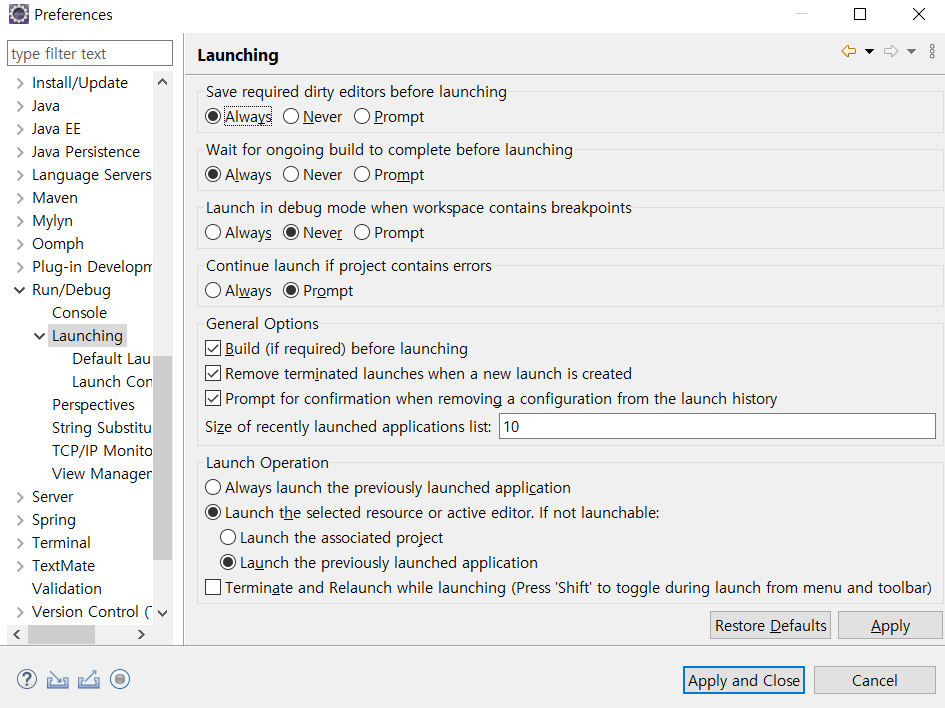
  • Run/Debug - Launching 제일 위의 옵션을 Always로 변경


8. lombok 설치

maven repository인 https://mvnrepository.com/artifact/org.projectlombok/lombok에서 원하는 버전의 maven dependency를 복제하여 pom.xml에 붙여넣기 합니다.

<!-- https://mvnrepository.com/artifact/org.projectlombok/lombok -->
<dependency>
    <groupId>org.projectlombok</groupId>
    <artifactId>lombok</artifactId>
    <version>1.18.12</version>
    <scope>provided</scope>
</dependency>

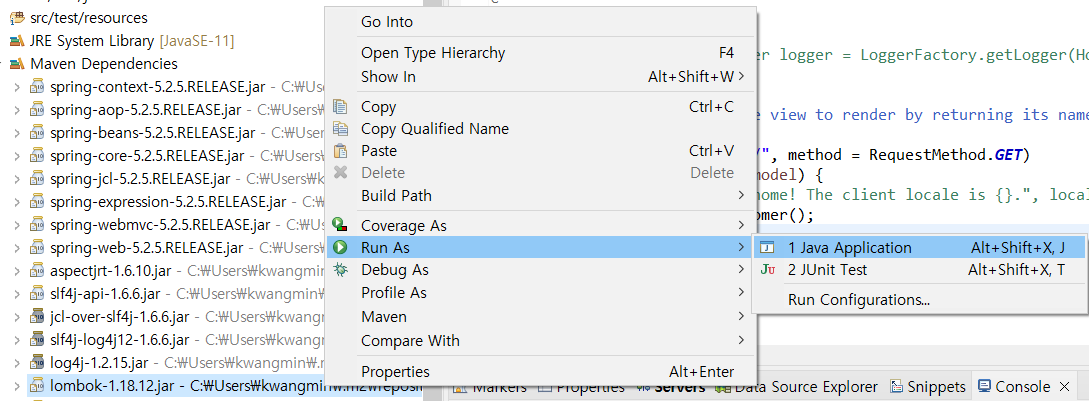
  • 붙여넣기 후 저장하면 maven dependencies에 추가된 것을 확인할 수 있습니다.
  • lombok.jar파일을 Run As 해줍니다.


  • 저는 바로 이클립스 경로가 잡혔으나, 안잡히는 경우 Specify location을 클릭해서 경로 지정
  • Install / Update 클릭 후 완료되면 이클립스를 재시작해줍니다.


9. MySQL 및 MyBatis 설정

1. pom.xml 의존성 추가

		<!-- https://mvnrepository.com/artifact/mysql/mysql-connector-java -->
		<dependency>
			<groupId>mysql</groupId>
			<artifactId>mysql-connector-java</artifactId>
			<version>8.0.21</version>
		</dependency>

		<!-- https://mvnrepository.com/artifact/org.mybatis/mybatis -->
		<dependency>
			<groupId>org.mybatis</groupId>
			<artifactId>mybatis</artifactId>
			<version>3.4.6</version>
		</dependency>

		<!-- https://mvnrepository.com/artifact/org.mybatis/mybatis-spring -->
		<dependency>
			<groupId>org.mybatis</groupId>
			<artifactId>mybatis-spring</artifactId>
			<version>1.3.2</version>
		</dependency>

		<!-- https://mvnrepository.com/artifact/org.springframework/spring-tx -->
		<dependency>
			<groupId>org.springframework</groupId>
			<artifactId>spring-tx</artifactId>
			<version>${org.springframework-version}</version>
		</dependency>

		<!-- https://mvnrepository.com/artifact/org.springframework/spring-jdbc -->
		<dependency>
			<groupId>org.springframework</groupId>
			<artifactId>spring-jdbc</artifactId>
			<version>${org.springframework-version}</version>
		</dependency>
		
		<!-- https://mvnrepository.com/artifact/org.springframework/spring-test -->
        <dependency>
            <groupId>org.springframework</groupId>
            <artifactId>spring-test</artifactId>
            <version>${org.springframework-version}</version>
        </dependency>


2. root-context.xml 수정

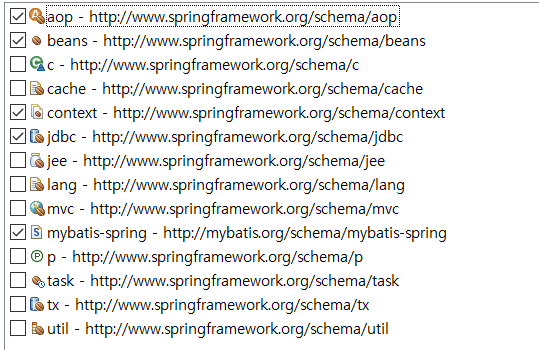
  • root-context.xml파일을 열고 namespace로 접근해서 다음 namespace를 체크해줍니다.


	<bean id="dataSource"
		class="org.springframework.jdbc.datasource.DriverManagerDataSource">
		<property name="driverClassName"
			value="com.mysql.cj.jdbc.Driver"></property>
		<property name="url"
			value="jdbc:mysql://localhost:3306/shoppingmall?serverTimezone=Asia/Seoul">
		</property>
		<property name="username" value="root"></property>
		<property name="password" value="asdf1234"></property>
	</bean>

	<bean id="sqlSessionFactory"
		class="org.mybatis.spring.SqlSessionFactoryBean">
		<property name="dataSource" ref="dataSource"></property>
		<property name="configLocation" value="classpath:/mybatis-config.xml"></property>
		<property name="mapperLocations" value="classpath:mapper/*.xml"></property>
	</bean>

	<mybatis-spring:scan base-package="com.spring.shoppingmall.mapper"/>
  • dataSource와 sqlSessionFactory를 빈으로 등록합니다.
  • dataSource의 username, password의 value값은 자신의 mysql의 id와 비밀번호를 입력해주시면 됩니다.
  • mybatis-sprint:scan에 mapper 인터페이스를 둘 패키지명을 입력합니다.


3. 테스트용 Mapper (interface 및 xml) 생성

package com.spring.shoppingmall.mapper;

public interface BoardMapper {
	public String getTime();
}
  • mybatis와 연동해서 사용할 mapper 인터페이스 입니다.
  • 여기서 작성한 메서드 명은 xml파일의 id와 동일하게 해야 합니다.


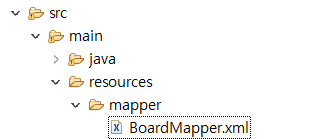
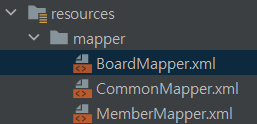
  • src - main - resources - mapper 경로에 mapper.xml 파일을 생성해주세요. (이름은 자유롭게)


<?xml version="1.0" encoding="UTF-8"?>
<!DOCTYPE mapper
  PUBLIC "-//mybatis.org//DTD Mapper 3.0//EN"
  "http://mybatis.org/dtd/mybatis-3-mapper.dtd">
<mapper namespace="com.spring.shoppingmall.mapper.BoardMapper">
	<select id="getTime" resultType="String">
		SELECT sysdate() FROM dual
	</select>
</mapper>
  • 테스트를 위한 SQL문을 작성했습니다.
  • <mapper namespace= ... : Mapper 인터페이스 패키지 경로를 모두 적어줍니다.
  • select의 id는 인터페이스에서 만들어준 메서드 이름과 동일하게 작성합니다.


4. 테스트할 컨트롤러 설정

	<context:component-scan base-package="com.spring.shoppingmall.controller" />
  • @Controller 어노테이션을 읽기 위해 servlet-context파일에 다음 코드를 추가합니다.
  • 각자 패키지명에 맞게 수정해주세요!


package com.spring.shoppingmall.controller;

import org.slf4j.Logger;
import org.slf4j.LoggerFactory;
import org.springframework.beans.factory.annotation.Autowired;
import org.springframework.stereotype.Controller;
import org.springframework.ui.Model;
import org.springframework.web.bind.annotation.RequestMapping;
import org.springframework.web.bind.annotation.RequestMethod;

import com.spring.shoppingmall.mapper.BoardMapper;

@Controller
public class HomeController {
	
	private static final Logger logger = LoggerFactory.getLogger(HomeController.class);
	
	@Autowired
	private BoardMapper boardMapper;
	
	@RequestMapping(value = "/", method = RequestMethod.GET)
	public String home(Model model) {
		logger.info("time : {}.", boardMapper.getTime());
		
		return "home";
	}
}
  • / 경로로 get 요청이 들어오면 home.jsp를 반환하는 컨트롤러입니다.
  • @Autowired를 사용해 boardMapper를 DI
  • boardMapper.getTime()을 통해 호출하여 확인해보겠습니다.

결과


5. 추가 (mybatis-config.xml)

<?xml version="1.0" encoding="UTF-8" ?>
<!DOCTYPE configuration
  PUBLIC "-//mybatis.org//DTD Config 3.0//EN"
  "http://mybatis.org/dtd/mybatis-3-config.dtd">
<configuration>
	<settings>
		<setting name="mapUnderscoreToCamelCase" value="true" />
	</settings>
</configuration>
  • 해당 코드를 통해 CamelCase(카멜케이스)를 사용 가능하도록 합니다. (DTO와 MySQL의 변수명을 맞추기 위함)
  • 해당 작업을 해주지 않으면 개발 중 List<DTO>에 mybatis를 통해 Mysql의 값을 가져와 넣어줄 때 null로 들어갈 수 있습니다.
    • 예 : DTO의 필드 변수명은 deleteYn인데 MySQL의 컬럼명은 delete_yn인 경우
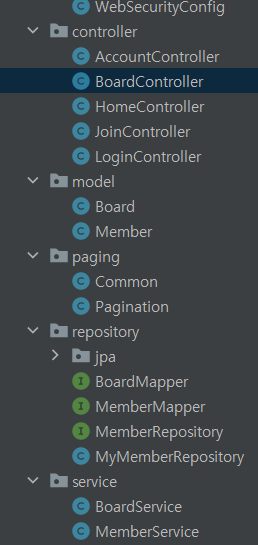
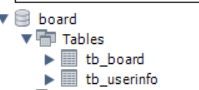
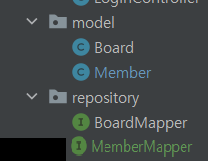
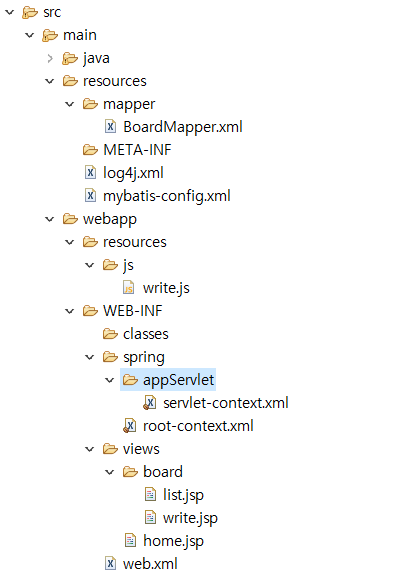
 

* 참고 (프로젝트 구조)

728x90

이전 파일 업로드 글과 연관지어 게시글 작성의 구현을 마무리하고 이를 정리하겠습니다.

파일첨부에 대해서는 언급하지 않겠습니다!

이전 글 : https://black-mint.tistory.com/62?category=982467 


[Spring Boot] 파일 첨부 (게시글 이미지 첨부)

게시글 작성에서 파일 첨부하는 방법을 기록한다. (본 글은 이미지 첨부 방법을 다룸) 1. Mysql - file 테이블 CREATE TABLE `tb_file` ( `id` int NOT NULL AUTO_INCREMENT, `board_id` int NOT NULL, `original_..

black-mint.tistory.com


1. Mysql - 테이블

CREATE TABLE `tb_board` (
  `id` int NOT NULL AUTO_INCREMENT,
  `title` varchar(255) NOT NULL,
  `content` text NOT NULL,
  `writer_id` int NOT NULL,
  `writer` varchar(20) NOT NULL,
  `delete_yn` varchar(1) DEFAULT 'N',
  `create_date` datetime DEFAULT NULL,
  `views` int DEFAULT '0',
  `type` varchar(20) DEFAULT 'board',
  PRIMARY KEY (`id`),
  KEY `writer_id` (`writer_id`),
  CONSTRAINT `tb_board_ibfk_1` FOREIGN KEY (`writer_id`) REFERENCES `tb_userinfo` (`id`) ON DELETE CASCADE
)


2. BoardDTO

@Data
public class Board {
    private Long id;
    private String title;
    private String content;
    private Long writerId;
    private String writer;
    private String deleteYN;
    private Timestamp createDate;
    private Long views;
    private String type;
}


3. 게시글 작성 Controller

// 게시글 신규 작성 폼 진입 & 기존 게시글 불러오기
@GetMapping("/form")
public String form(Model model, @RequestParam(required = false) Long boardId) {
    if (boardId == null) {
        model.addAttribute("board", new Board());
    } else {
        Board board = boardService.contentLoad(boardId, "board");
        model.addAttribute("board", board);
    }

    return "board/form";
}
  • 게시글 작성, 수정 화면으로 이동하는 GetMapping
  • 기존 게시글을 수정하는 경우 기존 게시글 내용을 추가해주기 위해 Service를 통해 정보를 얻어와 addAttribute를 진행


// 게시글 작성 & 수정
@PostMapping("/form")
public String boardSubmit(Board board, Principal principal,
                          @RequestParam(value = "files", required = false) List<MultipartFile> files,
                          @RequestParam(value = "boardId", required = false) Long boardId) throws IOException, SQLException {
    if (board.getTitle().length() < 1 || board.getContent().length() < 1 || (!CollectionUtils.isEmpty(files) && files.size() > 7)) {
        // 잘못된 입력값이 들어왔을 때 다시 해당 페이지로 로딩
        if(boardId != null) {
            return "redirect:/board/form?boardId=" + boardId;
        }
        return "redirect:/board/form";
    }

    String loginUsername = principal.getName();
    String type = "board";

    if (boardId == null) { // 새 글 작성
        Long newBoardId = boardService.save(board, loginUsername, type); // Insert

        // 첨부파일 있을 때
        if (!files.get(0).getOriginalFilename().isEmpty()) {
            for (int i = 0; i < files.size(); i++) {
                if (files.get(i).getContentType().contains("image/")) {
                    fileService.saveFile(files.get(i), newBoardId);
                } else {
                    System.out.println("이미지 타입이 아닙니다");
                }
            }
        }
    } else { // 기존 글 수정
        boardService.update(board, boardId, type); // Update
    }

    return "redirect:/board/list";
}
  • 이 전글에선 @Valid를 사용했지만 이번 글에서는 Javascript를 이용해 View에서 제목과 내용의 유무를 체크할 예정입니다. 물론 첫 줄의 검증 코드로 어느정도 검증을 진행! (Valid를 통해서 값을 검증하니 여러 오류가 발생했어요.. 이에 대한 대체 방안입니다,,,)
  • 작성(create), 수정(update)를 하나의 Controller와 View에서 처리하기 때문에 boardId(게시판 id)가 null인 상태와 null이 아닌 상태를 나눠서 처리했습니다.
  • type : 향후 다른 종류 게시판을 만들거나 공지사항 추가 등 서비스의 확장을 고려해 추가했습니다.


4. Service

// id를 이용해서 해당 글 수정
public Board contentLoad(Long id, String type) {
    Board board = new Board();
    board.setId(id);
    board.setType(type);
    try {
        board = boardRepository.findById(board);
    } catch (Exception e) {
        System.out.println("boardService.contentLoad() .. error : " + e.getMessage());
    } finally {
        return board;
    }
}
  • GetMapping에서 사용되는 contentLoad입니다.
// 글 등록
public Long save(Board board, String loginUsername, String type) {
    board.setCreateDate(Timestamp.valueOf(LocalDateTime.now()));

    try {
        Member member = memberService.getMember(loginUsername);

        board.setWriterId(member.getId());
        board.setWriter(member.getUsername());
        board.setType(type);

        boardRepository.insertBoard(board);
    } catch (Exception e) {
        System.out.println("boardService.save() .. error : " + e.getMessage());
    }
    return board.getId();
}
// 글 수정
public Long update(Board board, Long boardId, String type) {
    board.setId(boardId);
    board.setType(type);

    try {
        boardRepository.updateBoard(board);
    } catch (Exception e) {
        System.out.println("boardService.update() .. error : " + e.getMessage());
    }
    return board.getId();
}


5. Mapper.xml

<!--특정 아이디 게시글 조회-->
<select id="findById" resultType="Board">
    SELECT
        <include refid="boardColumns"/>
    FROM
        tb_board
    WHERE
        id = #{id} AND type = #{type}
</select>
  • type : board, notice 등으로 조회합니다. (해당 포스트 같은 경우 board입니다.)
  • 만약 공지사항을 조회한다면 notice가 들어갈 것입니다.


<!--게시글 작성-->
<insert id="insertBoard" parameterType="Board" useGeneratedKeys="true" keyProperty="id">
    INSERT INTO
         tb_board (title, content, writer_id, writer, create_date, type)
    VALUES
        (#{title}, #{content}, #{writerId}, #{writer}, #{createDate}, #{type})
</insert>

<!--게시글 업데이트-->
<update id="updateBoard" parameterType="Board" useGeneratedKeys="true" keyProperty="id">
    UPDATE
        tb_board
    SET
        title = #{title}
        ,content = #{content}
    WHERE
        id = #{id} AND type = #{type}
</update>
  • useGenratedKeys, keyProperty : insert와 update 시 결과값으로 완료된 row의 pk(id)를 반환받습니다.


6. View

			<form action="#" th:action="@{/board/form}" th:object="${board}" method="post" enctype="multipart/form-data"
				onsubmit="return checkForm(this);">
				<input type="hidden" name="boardId" th:value="*{id}">
				<input type="hidden" th:field="*{writerId}">
				<div class="mb-3">
					<label for="title" class="form-label">제목</label>
					<input type="text" class="form-control" id="title" th:field="*{title}">
				</div>
				<div class="mb-3">
					<label for="content" class="form-label">내용</label>
					<textarea class="form-control" id="content" rows="13" th:field="*{content}"></textarea>
				</div>

				<div id="imageThumbnail">
				</div>

				<!-- button -->
				<th:block th:if="${param.boardId} == null">
					<div id="uploadForm">
						<div id="uploadElement">
							<input id="uploadInput" type="file" class="btn btn-outline-primary" name="files"
								accept="image/*" onchange="setThumbnail(event);" multiple /> <span
								style="font-size: small;"> * jpeg / png 타입의
								이미지는
								최대 7개까지
								등록해주세요.</span>
						</div>
						<a id="reset" class="mt-3 btn btn-danger" onclick="resetImg()">초기화</a>
					</div>
				</th:block>


				<div class="nav justify-content-end mb-5">
					<button id="submit" type="submit" class="me-2 btn btn-primary">작성</button>
					<a type="button" class="btn btn-primary" th:href="@{/board/list}">나가기</a>
				</div>
			</form>
  • th:object - form을 제출할 때 설정된 객체로 리턴됩니다. (이 경우 컨트롤러의 Board)
  • th:field - 해당 값(name과 value)을 th:object에서 설정된 객체의 내부 값으로 설정됩니다. (Board.setId, Board.setTitle...등)
  • onsubmit : form 태그의 값을 서버로 전송하기 전에 실행하여 유효성을 체크합니다. 


7. form검증을 위한 script (파일 처리부분은 이 전글 참고)

		// form submit 검증
		function checkForm(form) {
			if (form.title.value == "") {
				alert('제목을 입력하세요.');
				form.title.classList.add('is-invalid');
				form.title.focus();
				return false;
			}

			if (form.content.value == "") {
				alert('내용을 입력하세요.');
				form.title.classList.remove('is-invalid');
				form.content.classList.add('is-invalid');
				form.content.focus();
				return false;
			}
			form.content.classList.remove('is-invalid');
			return true;
		}
  • onsubmit에서 this를 통해 받았기 때문에 form.[name]으로 element를 지정가능!
  • 제목이나 내용이 없을 경우 경고 팝업을 띄워주고, 해당 input 또는 textarea의 class에 is-invalid를 추가해줍니다. (bootstrap을 이용해 빨간 input칸으로 변화)
  • false를 return 받는 경우는 서버로 form 값이 제출 안됩니다.


8. 시연


728x90

첨부파일 관련 기능 구현 중 게시글 insert와 update 시 auto increment되는 게시글 번호를(PK) 가져와서 활용하려한다.

Mybatis에서 insert나 update 시 PK 값을 가져오는 방법을 기록한다.


1. Mapper 인터페이스

@Mapper
public interface BoardMapper {
	// 글 작성
	void insertBoard(Board board);
}
  • 파라미터로 받아진 Board 객체의 필드에 PK 값이 자동으로 들어간다. 때문에 void로 작성 가능

2. Mapper.xml

    <!--게시글 작성-->
    <insert id="insertBoard" parameterType="Board" useGeneratedKeys="true" keyProperty="id">
        INSERT INTO
            tb_board (title, content, writer_id, writer, create_date)
        VALUES
            (#{title}, #{content}, #{writerId}, #{writer}, #{createDate})
    </insert>
  • useGeneratedKeys와 keyProperty (PK)를 추가해주면 insert, update 시 자동 증가하는 PK 값을 Board의 필드 안에 자동 주입해준다.
728x90

1. 페이징 처리를 위한 필드들 정의 (Pagination.class)

2. 총 컨텐츠 개수, 현재 페이지, 현재 페이지 블록(범위) 를 받아서 처리

3. 화면에 보여주기(View)


1. 프로젝트 구조

2. Pagination, Common 코드

@Data
public class Pagination extends Common{

    private int listSize = 10;  // 초기값으로 목록개수를 10으로 셋팅
    private int rangeSize = 10; // 초기값으로 페이지범위를 10으로 셋팅
    private int page;           // 현재 페이지
    private int range;          // 현재 페이지 범위 (1~10 = 1)
    private int listCnt;        // 총 게시물 개수
    private int pageCnt;        // 총 페이지 개수
    private int startPage;      // 각 페이지 범위 중 시작 번호
    private int startList;      // mysql용 게시판 시작 번호 (0, 10, 20..)
    private int endPage;        // 각 페이지 범위 중 마지막 번호
    private boolean prev;       // 이전 페이지 여부
    private boolean next;       // 다음 페이지 여부

    public void pageInfo(int page, int range, int listCnt) {

        this.page = page; // 현재 페이지
        this.listCnt = listCnt; // 게시물 개수 총합

        // 페이지 범위
        this.range = range;

        // 전체 페이지수
        this.pageCnt = (int) Math.ceil((double) listCnt / listSize);

        // 시작 페이지
        this.startPage = (range - 1) * rangeSize + 1 ;

        // 끝 페이지
        this.endPage = range * rangeSize;

        // 게시판 시작번호
        this.startList = (page - 1) * listSize;

        // 이전 버튼 상태
        this.prev = range == 1 ? false : true;

        // 다음 버튼 상태
        this.next = endPage > pageCnt ? false : true;

        if(this.endPage > this.pageCnt) {
            this.endPage = this.pageCnt;
            this.next = false;
        }
    }
}
  • Pagination : 페이지 처리에 필요한 필드 Common을 상속받고 활용할 외부 정보를 저장
package com.min.board.paging;

import lombok.Data;

@Data
public class Common {
    private String searchText;
    private String writer;
    private String type;
}
  • Common : 메인 게시판, 내 글 관리, 휴지통 등 컨텐츠를 보여줄 때 아래 페이지 처리를 해야하는데 이 때 사용 
  • searchText : 검색 기능이 필요한 페이지의 경우 사용
  • writer : 내 글 관리, 휴지통 등에서 사용자 정보를 저장
  • type : 메인 게시판, 내 글 관리, 휴지통 등 DB에서 가져오는 값이 다르므로 Mapper에서 <if> 문으로 동적 쿼리 진행

3. Mapper 코드

@Mapper
public interface BoardMapper {

    // 게시글 개수 반환 (메인 게시글, 글 관리, 휴지통)
    int selectBoardTotalCount(Pagination pagination);

    // 게시글 리스트 (메인 게시글, 글 관리, 휴지통)
    List<Board> selectBoardList(Pagination pagination);
}
<?xml version="1.0" encoding="UTF-8"?>

<!DOCTYPE mapper PUBLIC "-//mybatis.org//DTD Mapper 3.0//EN"
        "http://mybatis.org/dtd/mybatis-3-mapper.dtd">

<mapper namespace="com.min.board.repository.BoardMapper">

    <sql id="boardColumns">
        id
        ,title
        ,content
        ,writer_id
        ,writer
        ,delete_yn
        ,create_date
        ,image
    </sql>

    <!--(페이징) 게시글 모두 조회-->
    <select id="selectBoardList" resultType="Board">
        SELECT
            <include refid="boardColumns"/>
        FROM
            tb_board
        WHERE
            <if test="'list'.equals(type)">
                <include refid="CommonMapper.search"/>
            </if>
            <if test="'myPost'.equals(type)">
                <include refid="CommonMapper.myPost"></include>
            </if>
            <if test="'trash'.equals(type)">
                <include refid="CommonMapper.trash"></include>
            </if>
        ORDER BY
            id DESC,
            create_date
        <include refid="CommonMapper.paging"/>
    </select>

    <!--(페이징을 위한 카운트) 게시글 개수 카운트-->
    <select id="selectBoardTotalCount" resultType="int">
        SELECT
            COUNT(*)
        FROM
            tb_board
        WHERE
            <if test="'list'.equals(type)">
                <include refid="CommonMapper.search"/>
            </if>
            <if test="'myPost'.equals(type)">
                <include refid="CommonMapper.myPost"></include>
            </if>
            <if test="'trash'.equals(type)">
                <include refid="CommonMapper.trash"></include>
            </if>
    </select>
</mapper>

<BoardMapper.xml>

<?xml version="1.0" encoding="UTF-8"?>

<!DOCTYPE mapper PUBLIC "-//mybatis.org//DTD Mapper 3.0//EN"
        "http://mybatis.org/dtd/mybatis-3-mapper.dtd">

<mapper namespace="CommonMapper">
    <sql id="paging">
        LIMIT
            #{startList}, #{listSize}
    </sql>

    <sql id="search">
        delete_yn = 'N'
        <if test="searchText != null and searchText !=''">
            AND
            (
            title LIKE CONCAT('%', #{searchText}, '%')
            OR content LIKE CONCAT('%', #{searchText}, '%')
            )
        </if>
    </sql>

    <sql id="myPost">
        delete_yn = 'N'
        <if test="writer != null and writer !=''">
            AND writer = #{writer}
        </if>
    </sql>

    <sql id="trash">
        delete_yn = 'Y'
        <if test="writer != null and writer !=''">
            AND writer = #{writer}
        </if>
    </sql>
</mapper>

<CommonMapper.xml>

  • 코드관리를 위해 CommonMapper로 동적 쿼리 진행할 코드를 분리


4.  Service 코드

// 전체 게시글 개수 리턴
public int getBoardListCnt(Pagination pagination) {
    int boardTotalCount = 0;

    try {
        boardTotalCount = boardRepository.selectBoardTotalCount(pagination);
    } catch (Exception e) {
        System.out.println("boardRepository.getBoardListCnt() .. error : " + e.getMessage());
    } finally {
        return boardTotalCount;
    }
}

// 전체 게시글 리스트로 리턴
public List<Board> getBoardList(Pagination pagination) {
    List<Board> boards = Collections.emptyList();

    try {
        boards = boardRepository.selectBoardList(pagination);
    } catch (Exception e) {
        System.out.println("boardRepository.getMyBoardList() .. error : " + e.getMessage());
    } finally {
        return boards;
    }
}


5. Controller 코드

// 게시판 리스트 (게시글 페이징 및 검색 리스트)
@GetMapping("/list")
public String list(Model model,
                   @RequestParam(required = false, defaultValue = "1") int page,
                   @RequestParam(required = false, defaultValue = "1") int range,
                   String searchText) {
    int listCount = 0;

    Pagination pagination = new Pagination();
    pagination.setSearchText(searchText);
    pagination.setType("list");
    listCount = boardService.getBoardListCnt(pagination);
    pagination.pageInfo(page, range, listCount);

    List<Board> boards = boardService.getBoardList(pagination);

    model.addAttribute("pagination", pagination);
    model.addAttribute("boardList", boards);

    return "board/list";
}
  • 메인 게시판에 페이징 처리를 위해 page, range, searchText를 받아온다.
  • pagination에 검색어, type(게시판 = list, 내가쓴글 = myPost, 휴지통 = trash 등을 선언해 type에 맞는 동적 쿼리문 실행 유도)을 저장
  • listCount에 pagination 객체를 이용해서 총 게시글 개수를 저장
  • 최종적으로 Pagination 객체에 page, range, listCount를 초기화
  • List 형태의 boards 를 생성해서 현재 페이지에 맞는 컨텐츠를 받아옴.
// 글 관리에서 삭제
@PostMapping("/myPost/delete")
public String boardDelete(@RequestParam(required = false) List<String> boardIdList) {
    if(boardIdList == null) return "redirect:/board/myPost";
    if(boardIdList.size() > 0) {
        for(int i = 0; i < boardIdList.size(); i ++) {
            boardService.temporaryDelete(Long.parseLong(boardIdList.get(i)));
        }
    }

    return "redirect:/board/myPost";
}


6. View

            <p> 총 건수 : <span th:text="${pagination.listCnt}"></span></p>
            <form class="row g-3 justify-content-end" method="GET" th:action="@{/board/list}" name="searchForm">
                <div class="col-auto">
                    <input type="hidden" name="page" th:value="${param.page}">
                    <input type="hidden" name="range" th:value="${param.range}">
                    <label for="searchText" class="visually-hidden"></label>
                    <input type="text" class="form-control" id="searchText" name="searchText" th:value=${param.searchText}>
                </div>
                <div class="col-auto">
                    <button type="submit" class="btn btn-outline-secondary mb-3">Search</button>
                </div>
            </form>
            .
            .
            .
                <tbody>
                    <tr th:each="board : ${boardList}">
                        <td class="mt-5 text-center" scope="row" th:text="${board.id}">1</td>
                        <td><a th:text="${board.title}" th:href="@{/board/post(id=${board.id})}" style="text-decoration:none; color:black;">제목</a></td>
                        <td class="text-center" th:text="${#dates.format(board.createDate, 'yyyy/MM/dd HH:mm')}">작성일</td>
                        <td class="text-center" th:text="${board.writer}">작성자</td>
                    </tr>
                </tbody>
            </table>

            <!-- Page -->
            <nav th:replace="fragments/pagingCommon :: pagination(${pagination}, 'list')"></nav>

<list.html>

  • pagination.listCnt : 보여줄 게시글의 총 개수
  • input - hidden : name으로 컨트롤러로 page, range를 전송 (GET 방식이므로 url에 표시)
    • value=${param.range}" : url에 표시되는 range=3 값을 가져와 해당 input태그 값으로 셋팅
  • input - searchText : 컨트롤러로 searchText를 전송해서 결과값을 얻도록 유도 (th:value를 이용해서 검색후에도 해당 칸에 검색어가 그대로 남아있음)
  • <tbody> : 테이블에 게시판 글을 보여주기위한 컨텐츠
    • th:each="board : ${boardList}"> : 컨트롤러에서 받아온 List형태인 boardList를 변수명 board로 정의해서 리스트 값을 꺼내서 사용
    • ${dates.format(board.createDate, 'yyyy/MM/dd HH:mm')} : 날짜 형식을 2021/12/28 19:48 로 변경
 

[Spring Boot] Timestamp로 회원가입 시간 저장 (MySQL)

1. MySQL 시간을 담을 컬럼은 DATETIME으로 설정 2. DTO에 Timestamp 타입으로 선언 private Timestamp createDate; 3. 생성 시점에 시간 셋팅해주기 member.setCreateDate(Timestamp.valueOf(LocalDateTime.now()..

black-mint.tistory.com

  • th:replace="fragments/pagingCommon :: pagination(${pagination}, 'list')" : 프래그먼트를 이용해 분리된 페이징 화면을 불러와 사용
 

[Spring Boot] Thymeleaf 정리

스프링부트에서 타임리프로 프로젝트를 진행 중 2번 이상 다시 찾아본 개념에 대해 정리해놓으려 합니다. 기본 타임리프 문서 : https://www.thymeleaf.org/doc/tutorials/2.1/usingthymeleaf.html#standard-htmlx..

black-mint.tistory.com

list 화면


            <!-- contents -->
            <form class="row g-3 justify-content-end" method="post" th:action="@{/board/myPost/delete}">
                <table class="table caption-top table-bordered table-hover">
                    <caption>List</caption>
                    <thead>
                        <tr>
                            <th class="text-center" width="50" scope="col"></th>
                            <th class="text-center" width="50" scope="col">No</th>
                            <th class="text-center" width="950" scope="col">제목</th>
                            <th class="text-center" width="200" scope="col">작성일</th>
                            <th class="text-center" width="180" scope="col">작성자</th>
                        </tr>
                    </thead>

                    <tbody>
                        <tr th:each="board : ${boardList}">
                            <td class="mt-5 text-center" scope="row">
                                <div class="checkbox">
                                    <input type="checkbox" name="boardIdList" th:value="${board.id}">
                                </div>
                            </td>
                            <td class="mt-5 text-center" scope="row" th:text="${board.id}">1</td>
                            <td><a th:text="${board.title}" th:href="@{/board/post(id=${board.id})}"
                                    style="text-decoration:none; color:black;">제목</a></td>
                            <td class="text-center" th:text="${#dates.format(board.createDate, 'yyyy/MM/dd HH:mm')}">작성일
                            </td>
                            <td class="text-center" th:text="${board.writer}">작성자</td>
                        </tr>
                    </tbody>
                </table>
                <div class="nav justify-content-end">
                    <button type="submit" class="btn btn-danger">Delete</button>
                </div>
            </form>

            <!-- Page -->
            <nav th:replace="fragments/pagingCommon :: pagination(${pagination}, 'myPost')"></nav>

<myPost.html>

myPost 화면

  • input - checbox : 내 글 관리에서 체크박스로 삭제할 컨텐츠를 체크하기 위한 체크박스
    • th:value를 이용해서 해당 체크박스의 값을 컨텐츠 id로 지정
    • name을 컨트롤러의 파라미터와 똑같은 이름으로 설정
<body>
	<nav aria-label="Page navigation example" th:fragment="pagination(pagination, menu)">
		<ul class="pagination justify-content-center">
			<th:block th:with="start = ${pagination.startPage}, end = ${pagination.endPage}">
				<li class="page-item" th:classappend="${pagination.prev == false} ? 'disabled'">
					<a class="page-link" th:href="@{'/board/' + ${menu}(page=${start - 1}, range=${pagination.range - 1}, 
					searchText=${param.searchText})}">Previous</a>
				</li>

				<li class="page-item" th:classappend="${i == pagination.page} ? 'disabled'" th:if="${i != 0}"
					th:each="i : ${#numbers.sequence(start, end)}"><a class="page-link" href="#" th:href="@{'/board/' + ${menu}(page=${i}, 
					range=${pagination.range}, searchText=${param.searchText})}" th:text="${i}">1</a></li>

				<li class="page-item" th:classappend="${pagination.next == false} ? 'disabled'">
					<a class="page-link" th:href="@{'/board/'+ ${menu}(page=${end + 1}, range=${pagination.range + 1}, 
					searchText=${param.searchText})}" href="#">Next</a>
				</li>
			</th:block>
		</ul>
	</nav>
</body>

<pagingCommon.html>

  • th:fragment : 위 코드들에서 th:replace 붙은 곳에 보여짐
  • th:block - th:with : 새로운 변수 초기화 후 사용
  • https://black-mint.tistory.com/19의 4번에 정리
 

[Spring Boot] Thymeleaf 정리

스프링부트에서 타임리프로 프로젝트를 진행 중 2번 이상 다시 찾아본 개념에 대해 정리해놓으려 합니다. 기본 타임리프 문서 : https://www.thymeleaf.org/doc/tutorials/2.1/usingthymeleaf.html#standard-htmlx..

black-mint.tistory.com


728x90

1. MySQL 테이블 상태

CREATE TABLE `tb_board` (
  `id` int NOT NULL AUTO_INCREMENT,
  `title` varchar(255) NOT NULL,
  `content` text NOT NULL,
  `writer_id` int NOT NULL,
  `delete_yn` varchar(1) DEFAULT 'N',
  `image` varchar(255) DEFAULT NULL,
  PRIMARY KEY (`id`),
  KEY `writer_id` (`writer_id`),
  CONSTRAINT `tb_board_ibfk_1` FOREIGN KEY (`writer_id`) REFERENCES `tb_userinfo` (`id`) ON DELETE CASCADE
) ENGINE=InnoDB AUTO_INCREMENT=6 DEFAULT CHARSET=utf8mb4 COLLATE=utf8mb4_0900_ai_ci
CREATE TABLE `tb_userinfo` (
  `id` int NOT NULL AUTO_INCREMENT,
  `username` varchar(20) NOT NULL,
  `password` varchar(100) NOT NULL,
  `email` varchar(45) NOT NULL,
  `role` varchar(20) DEFAULT 'MEMBER',
  PRIMARY KEY (`id`),
  UNIQUE KEY `id` (`id`,`username`)
) ENGINE=InnoDB AUTO_INCREMENT=2 DEFAULT CHARSET=utf8mb4 COLLATE=utf8mb4_0900_ai_ci

2. build.gradle 의존성 추가

implementation 'org.springframework.boot:spring-boot-starter-data-jdbc'
implementation 'org.mybatis.spring.boot:mybatis-spring-boot-starter:2.1.4'

3. application.properties 작성

spring.datasource.driver-class-name=com.mysql.cj.jdbc.Driver
spring.datasource.url=jdbc:mysql://localhost:3306/board?serverTimezone=Asia/Seoul&characterEncoding=UTF-8
spring.datasource.username=아이디
spring.datasource.password=비밀번호
spring.devtools.livereload.enabled=true
spring.freemaker.cache=false
spring.thymeleaf.cache=false

# MyBatis
# mapper.xml 위치 src/main/resource/mapper/**/*.xml
mybatis.mapper-locations=classpath:mapper/**/*.xml

# camel case
mybatis.configuration.map-underscore-to-camel-case=true

# 패키지명 alias
mybatis.type-aliases-package=com.min.board.model

# mapper 로그정보
logging.level.com.min.board.model.repository=TRACE

4. 모델 추가 및 Mapper 인터페이스 추가

@Data
public class Board {

    private Long id;

    @NotNull
    @Size(min = 2, max = 30, message = "제목은 2자 이상 30자 이하입니다.")
    private String title;

    @NotNull
    @NotBlank(message = "내용을 입력하세요.")
    private String content;
    private Long writerId;
    private String writer;
    private String deleteYN;
    private Timestamp createDate;

    private String image;
}
@Mapper
public interface BoardMapper {
    // 모든 글 조회
    List<Board> selectAllBoards();

    // 게시글 개수 반환 (메인 게시글, 글 관리, 휴지통)
    int selectBoardTotalCount(Pagination pagination);

    // 삭제된 글 제외 모두 조회 (메인 게시글, 글 관리, 휴지통)
    List<Board> selectBoardList(Pagination pagination);

    // 게시글 수정
    void updateBoard(Board board);

    // 아이디로 글 찾기
    Board findById(Long id);

    // 휴지통으로 이동 (임시삭제)
    void temporaryDeleteById(Long id);

    // 글 작성
    void insertBoard(Board board);

    // 휴지통 비우기
    void permanentlyDeleteById(Long boardId);
}

5. resources/mapper 에 mapper.xml 추가

구조

<?xml version="1.0" encoding="UTF-8"?>

<!DOCTYPE mapper PUBLIC "-//mybatis.org//DTD Mapper 3.0//EN"
        "http://mybatis.org/dtd/mybatis-3-mapper.dtd">

<mapper namespace="CommonMapper">
    <sql id="paging">
        LIMIT
            #{startList}, #{listSize}
    </sql>

    <sql id="search">
        delete_yn = 'N'
        <if test="searchText != null and searchText !=''">
            AND
            (
            title LIKE CONCAT('%', #{searchText}, '%')
            OR content LIKE CONCAT('%', #{searchText}, '%')
            )
        </if>
    </sql>

    <sql id="myPost">
        delete_yn = 'N'
        <if test="writer != null and writer !=''">
            AND writer = #{writer}
        </if>
    </sql>

    <sql id="trash">
        delete_yn = 'Y'
        <if test="writer != null and writer !=''">
            AND writer = #{writer}
        </if>
    </sql>
</mapper>
  • <sql> : <include>를 통해 다른 쿼리에 활용 가능
  • refid : 참조
  • (select, update, insert, delete의) id : Mapper인터페이스 함수명과 동일
  • parameterType : #{}에 들어갈 파라미터 타입 (사용 권장하지 않음.)
  • resultType : 쿼리 결과 타입
  • #{} : 파리미터(get을 의미) -> DTO(모델)과 똑같은 필드명 작성
    • #{id} => getId
  • <if> : if문. test="조건"

참조 매퍼

<?xml version="1.0" encoding="UTF-8"?>

<!DOCTYPE mapper PUBLIC "-//mybatis.org//DTD Mapper 3.0//EN"
        "http://mybatis.org/dtd/mybatis-3-mapper.dtd">

<mapper namespace="CommonMapper">
    <sql id="paging">
        LIMIT
            #{startList}, #{listSize}
    </sql>

    <sql id="search">
        delete_yn = 'N'
        <if test="searchText != null and searchText !=''">
            AND
            (
            title LIKE CONCAT('%', #{searchText}, '%')
            OR content LIKE CONCAT('%', #{searchText}, '%')
            )
        </if>
    </sql>

    <sql id="myPost">
        delete_yn = 'N'
        <if test="writer != null and writer !=''">
            AND writer = #{writer}
        </if>
    </sql>

    <sql id="trash">
        delete_yn = 'Y'
        <if test="writer != null and writer !=''">
            AND writer = #{writer}
        </if>
    </sql>
</mapper>

6. Service에서 사용

    private final BoardMapper boardMapper;

    @Autowired
    public BoardService(BoardMapper boardMapper) {
        this.boardMapper = boardMapper;
    }

    // id를 이용해서 해당 글 수정
    public Board contentLoad(Long id) {
        Board board = boardMapper.findById(id);
        return board;
    }


+ Recent posts