728x90

1. 페이징 처리를 위한 필드들 정의 (Pagination.class)

2. 총 컨텐츠 개수, 현재 페이지, 현재 페이지 블록(범위) 를 받아서 처리

3. 화면에 보여주기(View)


1. 프로젝트 구조

2. Pagination, Common 코드

@Data
public class Pagination extends Common{

    private int listSize = 10;  // 초기값으로 목록개수를 10으로 셋팅
    private int rangeSize = 10; // 초기값으로 페이지범위를 10으로 셋팅
    private int page;           // 현재 페이지
    private int range;          // 현재 페이지 범위 (1~10 = 1)
    private int listCnt;        // 총 게시물 개수
    private int pageCnt;        // 총 페이지 개수
    private int startPage;      // 각 페이지 범위 중 시작 번호
    private int startList;      // mysql용 게시판 시작 번호 (0, 10, 20..)
    private int endPage;        // 각 페이지 범위 중 마지막 번호
    private boolean prev;       // 이전 페이지 여부
    private boolean next;       // 다음 페이지 여부

    public void pageInfo(int page, int range, int listCnt) {

        this.page = page; // 현재 페이지
        this.listCnt = listCnt; // 게시물 개수 총합

        // 페이지 범위
        this.range = range;

        // 전체 페이지수
        this.pageCnt = (int) Math.ceil((double) listCnt / listSize);

        // 시작 페이지
        this.startPage = (range - 1) * rangeSize + 1 ;

        // 끝 페이지
        this.endPage = range * rangeSize;

        // 게시판 시작번호
        this.startList = (page - 1) * listSize;

        // 이전 버튼 상태
        this.prev = range == 1 ? false : true;

        // 다음 버튼 상태
        this.next = endPage > pageCnt ? false : true;

        if(this.endPage > this.pageCnt) {
            this.endPage = this.pageCnt;
            this.next = false;
        }
    }
}
  • Pagination : 페이지 처리에 필요한 필드 Common을 상속받고 활용할 외부 정보를 저장
package com.min.board.paging;

import lombok.Data;

@Data
public class Common {
    private String searchText;
    private String writer;
    private String type;
}
  • Common : 메인 게시판, 내 글 관리, 휴지통 등 컨텐츠를 보여줄 때 아래 페이지 처리를 해야하는데 이 때 사용 
  • searchText : 검색 기능이 필요한 페이지의 경우 사용
  • writer : 내 글 관리, 휴지통 등에서 사용자 정보를 저장
  • type : 메인 게시판, 내 글 관리, 휴지통 등 DB에서 가져오는 값이 다르므로 Mapper에서 <if> 문으로 동적 쿼리 진행

3. Mapper 코드

@Mapper
public interface BoardMapper {

    // 게시글 개수 반환 (메인 게시글, 글 관리, 휴지통)
    int selectBoardTotalCount(Pagination pagination);

    // 게시글 리스트 (메인 게시글, 글 관리, 휴지통)
    List<Board> selectBoardList(Pagination pagination);
}
<?xml version="1.0" encoding="UTF-8"?>

<!DOCTYPE mapper PUBLIC "-//mybatis.org//DTD Mapper 3.0//EN"
        "http://mybatis.org/dtd/mybatis-3-mapper.dtd">

<mapper namespace="com.min.board.repository.BoardMapper">

    <sql id="boardColumns">
        id
        ,title
        ,content
        ,writer_id
        ,writer
        ,delete_yn
        ,create_date
        ,image
    </sql>

    <!--(페이징) 게시글 모두 조회-->
    <select id="selectBoardList" resultType="Board">
        SELECT
            <include refid="boardColumns"/>
        FROM
            tb_board
        WHERE
            <if test="'list'.equals(type)">
                <include refid="CommonMapper.search"/>
            </if>
            <if test="'myPost'.equals(type)">
                <include refid="CommonMapper.myPost"></include>
            </if>
            <if test="'trash'.equals(type)">
                <include refid="CommonMapper.trash"></include>
            </if>
        ORDER BY
            id DESC,
            create_date
        <include refid="CommonMapper.paging"/>
    </select>

    <!--(페이징을 위한 카운트) 게시글 개수 카운트-->
    <select id="selectBoardTotalCount" resultType="int">
        SELECT
            COUNT(*)
        FROM
            tb_board
        WHERE
            <if test="'list'.equals(type)">
                <include refid="CommonMapper.search"/>
            </if>
            <if test="'myPost'.equals(type)">
                <include refid="CommonMapper.myPost"></include>
            </if>
            <if test="'trash'.equals(type)">
                <include refid="CommonMapper.trash"></include>
            </if>
    </select>
</mapper>

<BoardMapper.xml>

<?xml version="1.0" encoding="UTF-8"?>

<!DOCTYPE mapper PUBLIC "-//mybatis.org//DTD Mapper 3.0//EN"
        "http://mybatis.org/dtd/mybatis-3-mapper.dtd">

<mapper namespace="CommonMapper">
    <sql id="paging">
        LIMIT
            #{startList}, #{listSize}
    </sql>

    <sql id="search">
        delete_yn = 'N'
        <if test="searchText != null and searchText !=''">
            AND
            (
            title LIKE CONCAT('%', #{searchText}, '%')
            OR content LIKE CONCAT('%', #{searchText}, '%')
            )
        </if>
    </sql>

    <sql id="myPost">
        delete_yn = 'N'
        <if test="writer != null and writer !=''">
            AND writer = #{writer}
        </if>
    </sql>

    <sql id="trash">
        delete_yn = 'Y'
        <if test="writer != null and writer !=''">
            AND writer = #{writer}
        </if>
    </sql>
</mapper>

<CommonMapper.xml>

  • 코드관리를 위해 CommonMapper로 동적 쿼리 진행할 코드를 분리


4.  Service 코드

// 전체 게시글 개수 리턴
public int getBoardListCnt(Pagination pagination) {
    int boardTotalCount = 0;

    try {
        boardTotalCount = boardRepository.selectBoardTotalCount(pagination);
    } catch (Exception e) {
        System.out.println("boardRepository.getBoardListCnt() .. error : " + e.getMessage());
    } finally {
        return boardTotalCount;
    }
}

// 전체 게시글 리스트로 리턴
public List<Board> getBoardList(Pagination pagination) {
    List<Board> boards = Collections.emptyList();

    try {
        boards = boardRepository.selectBoardList(pagination);
    } catch (Exception e) {
        System.out.println("boardRepository.getMyBoardList() .. error : " + e.getMessage());
    } finally {
        return boards;
    }
}


5. Controller 코드

// 게시판 리스트 (게시글 페이징 및 검색 리스트)
@GetMapping("/list")
public String list(Model model,
                   @RequestParam(required = false, defaultValue = "1") int page,
                   @RequestParam(required = false, defaultValue = "1") int range,
                   String searchText) {
    int listCount = 0;

    Pagination pagination = new Pagination();
    pagination.setSearchText(searchText);
    pagination.setType("list");
    listCount = boardService.getBoardListCnt(pagination);
    pagination.pageInfo(page, range, listCount);

    List<Board> boards = boardService.getBoardList(pagination);

    model.addAttribute("pagination", pagination);
    model.addAttribute("boardList", boards);

    return "board/list";
}
  • 메인 게시판에 페이징 처리를 위해 page, range, searchText를 받아온다.
  • pagination에 검색어, type(게시판 = list, 내가쓴글 = myPost, 휴지통 = trash 등을 선언해 type에 맞는 동적 쿼리문 실행 유도)을 저장
  • listCount에 pagination 객체를 이용해서 총 게시글 개수를 저장
  • 최종적으로 Pagination 객체에 page, range, listCount를 초기화
  • List 형태의 boards 를 생성해서 현재 페이지에 맞는 컨텐츠를 받아옴.
// 글 관리에서 삭제
@PostMapping("/myPost/delete")
public String boardDelete(@RequestParam(required = false) List<String> boardIdList) {
    if(boardIdList == null) return "redirect:/board/myPost";
    if(boardIdList.size() > 0) {
        for(int i = 0; i < boardIdList.size(); i ++) {
            boardService.temporaryDelete(Long.parseLong(boardIdList.get(i)));
        }
    }

    return "redirect:/board/myPost";
}


6. View

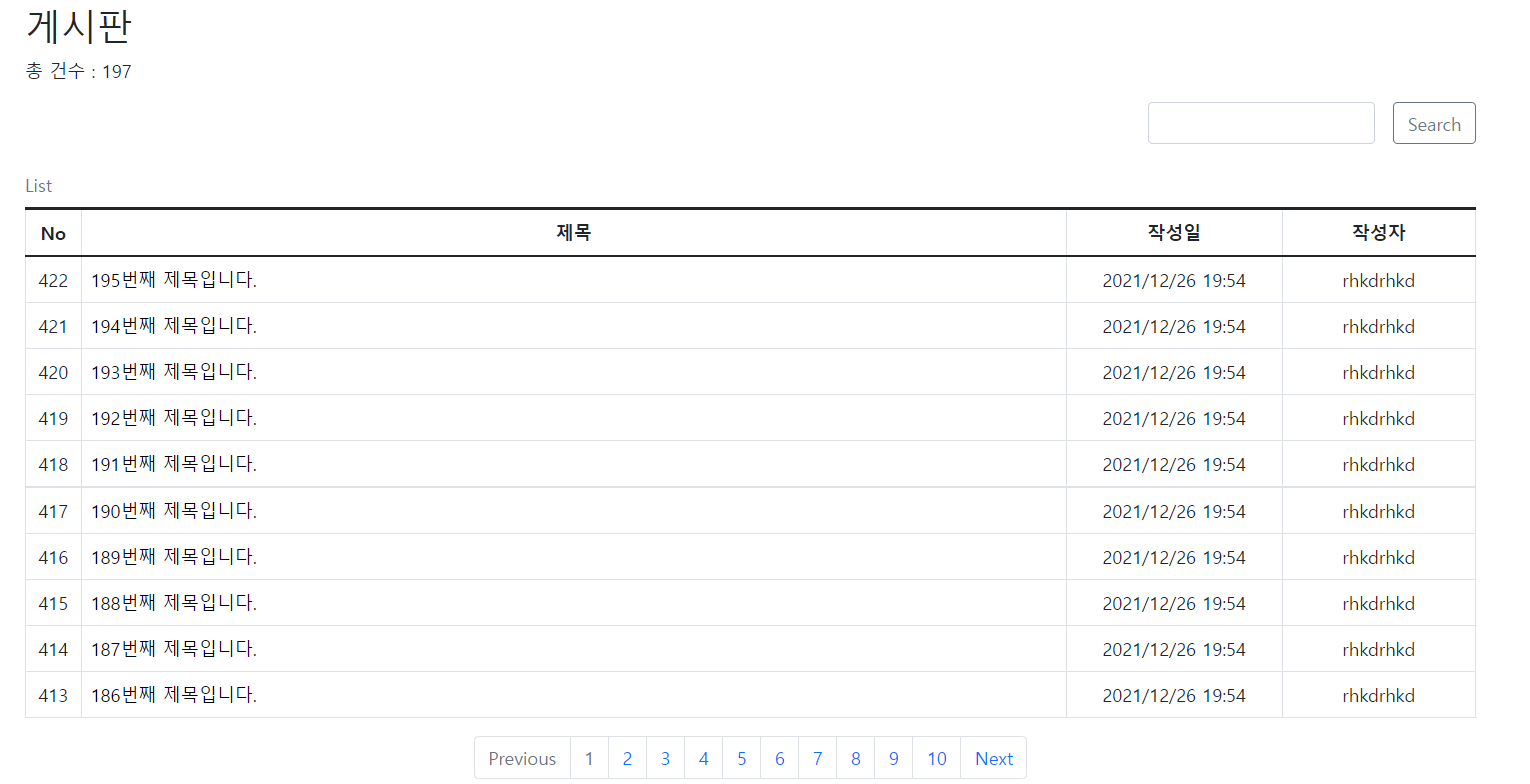
            <p> 총 건수 : <span th:text="${pagination.listCnt}"></span></p>
            <form class="row g-3 justify-content-end" method="GET" th:action="@{/board/list}" name="searchForm">
                <div class="col-auto">
                    <input type="hidden" name="page" th:value="${param.page}">
                    <input type="hidden" name="range" th:value="${param.range}">
                    <label for="searchText" class="visually-hidden"></label>
                    <input type="text" class="form-control" id="searchText" name="searchText" th:value=${param.searchText}>
                </div>
                <div class="col-auto">
                    <button type="submit" class="btn btn-outline-secondary mb-3">Search</button>
                </div>
            </form>
            .
            .
            .
                <tbody>
                    <tr th:each="board : ${boardList}">
                        <td class="mt-5 text-center" scope="row" th:text="${board.id}">1</td>
                        <td><a th:text="${board.title}" th:href="@{/board/post(id=${board.id})}" style="text-decoration:none; color:black;">제목</a></td>
                        <td class="text-center" th:text="${#dates.format(board.createDate, 'yyyy/MM/dd HH:mm')}">작성일</td>
                        <td class="text-center" th:text="${board.writer}">작성자</td>
                    </tr>
                </tbody>
            </table>

            <!-- Page -->
            <nav th:replace="fragments/pagingCommon :: pagination(${pagination}, 'list')"></nav>

<list.html>

  • pagination.listCnt : 보여줄 게시글의 총 개수
  • input - hidden : name으로 컨트롤러로 page, range를 전송 (GET 방식이므로 url에 표시)
    • value=${param.range}" : url에 표시되는 range=3 값을 가져와 해당 input태그 값으로 셋팅
  • input - searchText : 컨트롤러로 searchText를 전송해서 결과값을 얻도록 유도 (th:value를 이용해서 검색후에도 해당 칸에 검색어가 그대로 남아있음)
  • <tbody> : 테이블에 게시판 글을 보여주기위한 컨텐츠
    • th:each="board : ${boardList}"> : 컨트롤러에서 받아온 List형태인 boardList를 변수명 board로 정의해서 리스트 값을 꺼내서 사용
    • ${dates.format(board.createDate, 'yyyy/MM/dd HH:mm')} : 날짜 형식을 2021/12/28 19:48 로 변경
 

[Spring Boot] Timestamp로 회원가입 시간 저장 (MySQL)

1. MySQL 시간을 담을 컬럼은 DATETIME으로 설정 2. DTO에 Timestamp 타입으로 선언 private Timestamp createDate; 3. 생성 시점에 시간 셋팅해주기 member.setCreateDate(Timestamp.valueOf(LocalDateTime.now()..

black-mint.tistory.com

  • th:replace="fragments/pagingCommon :: pagination(${pagination}, 'list')" : 프래그먼트를 이용해 분리된 페이징 화면을 불러와 사용
 

[Spring Boot] Thymeleaf 정리

스프링부트에서 타임리프로 프로젝트를 진행 중 2번 이상 다시 찾아본 개념에 대해 정리해놓으려 합니다. 기본 타임리프 문서 : https://www.thymeleaf.org/doc/tutorials/2.1/usingthymeleaf.html#standard-htmlx..

black-mint.tistory.com

list 화면


            <!-- contents -->
            <form class="row g-3 justify-content-end" method="post" th:action="@{/board/myPost/delete}">
                <table class="table caption-top table-bordered table-hover">
                    <caption>List</caption>
                    <thead>
                        <tr>
                            <th class="text-center" width="50" scope="col"></th>
                            <th class="text-center" width="50" scope="col">No</th>
                            <th class="text-center" width="950" scope="col">제목</th>
                            <th class="text-center" width="200" scope="col">작성일</th>
                            <th class="text-center" width="180" scope="col">작성자</th>
                        </tr>
                    </thead>

                    <tbody>
                        <tr th:each="board : ${boardList}">
                            <td class="mt-5 text-center" scope="row">
                                <div class="checkbox">
                                    <input type="checkbox" name="boardIdList" th:value="${board.id}">
                                </div>
                            </td>
                            <td class="mt-5 text-center" scope="row" th:text="${board.id}">1</td>
                            <td><a th:text="${board.title}" th:href="@{/board/post(id=${board.id})}"
                                    style="text-decoration:none; color:black;">제목</a></td>
                            <td class="text-center" th:text="${#dates.format(board.createDate, 'yyyy/MM/dd HH:mm')}">작성일
                            </td>
                            <td class="text-center" th:text="${board.writer}">작성자</td>
                        </tr>
                    </tbody>
                </table>
                <div class="nav justify-content-end">
                    <button type="submit" class="btn btn-danger">Delete</button>
                </div>
            </form>

            <!-- Page -->
            <nav th:replace="fragments/pagingCommon :: pagination(${pagination}, 'myPost')"></nav>

<myPost.html>

myPost 화면

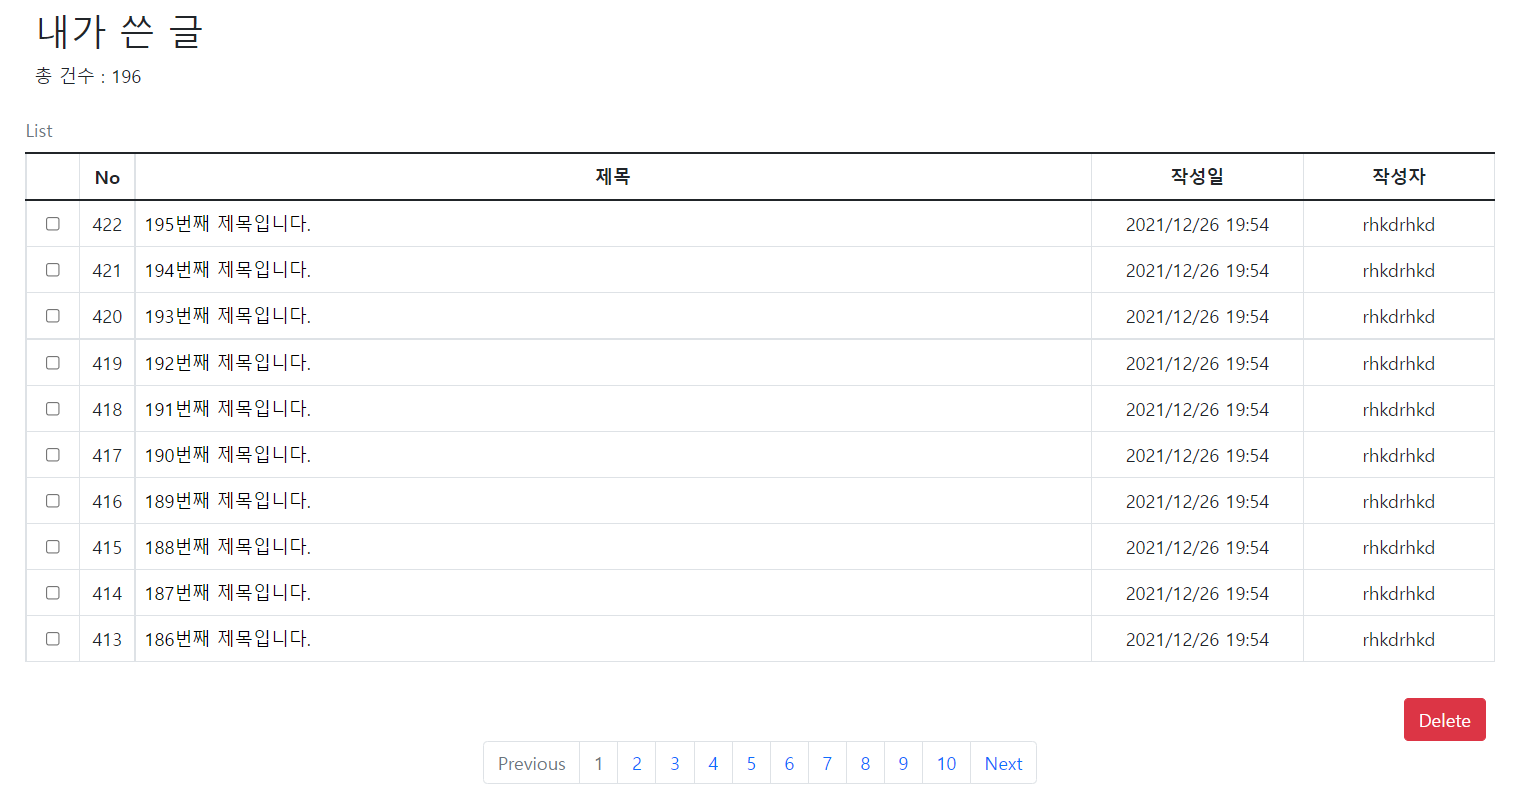
  • input - checbox : 내 글 관리에서 체크박스로 삭제할 컨텐츠를 체크하기 위한 체크박스
    • th:value를 이용해서 해당 체크박스의 값을 컨텐츠 id로 지정
    • name을 컨트롤러의 파라미터와 똑같은 이름으로 설정
<body>
	<nav aria-label="Page navigation example" th:fragment="pagination(pagination, menu)">
		<ul class="pagination justify-content-center">
			<th:block th:with="start = ${pagination.startPage}, end = ${pagination.endPage}">
				<li class="page-item" th:classappend="${pagination.prev == false} ? 'disabled'">
					<a class="page-link" th:href="@{'/board/' + ${menu}(page=${start - 1}, range=${pagination.range - 1}, 
					searchText=${param.searchText})}">Previous</a>
				</li>

				<li class="page-item" th:classappend="${i == pagination.page} ? 'disabled'" th:if="${i != 0}"
					th:each="i : ${#numbers.sequence(start, end)}"><a class="page-link" href="#" th:href="@{'/board/' + ${menu}(page=${i}, 
					range=${pagination.range}, searchText=${param.searchText})}" th:text="${i}">1</a></li>

				<li class="page-item" th:classappend="${pagination.next == false} ? 'disabled'">
					<a class="page-link" th:href="@{'/board/'+ ${menu}(page=${end + 1}, range=${pagination.range + 1}, 
					searchText=${param.searchText})}" href="#">Next</a>
				</li>
			</th:block>
		</ul>
	</nav>
</body>

<pagingCommon.html>

  • th:fragment : 위 코드들에서 th:replace 붙은 곳에 보여짐
  • th:block - th:with : 새로운 변수 초기화 후 사용
  • https://black-mint.tistory.com/19의 4번에 정리
 

[Spring Boot] Thymeleaf 정리

스프링부트에서 타임리프로 프로젝트를 진행 중 2번 이상 다시 찾아본 개념에 대해 정리해놓으려 합니다. 기본 타임리프 문서 : https://www.thymeleaf.org/doc/tutorials/2.1/usingthymeleaf.html#standard-htmlx..

black-mint.tistory.com


728x90

아이디 중복 체크 같은 커스텀이 필요한 검증을 하려면 Validator를 구현해줘야 한다.

@Valid사용으로 기본 검증에 대한 내용: https://black-mint.tistory.com/25


[Spring Boot] @Valid로 폼 입력값 검증하기

Entity 클래스에 @Id, @Size, @NotBlank 등을 붙여주고 Controller 클래스에서 @Valid 어노테이션을 추가적으로 사용함으로써 기본적인 검증은 가능하다. 1. 기본 form 입력값 검증하기 @Data @Entity @DynamicUpd..

black-mint.tistory.com

1. Validator 인터페이스 구현

@Component
public class MemeberValidator implements Validator {

    @Autowired
    private MemberService memberService;

    @Override
    public boolean supports(Class<?> clazz) {
        return Member.class.equals(clazz);
    }

    @Override
    public void validate(Object obj, Errors errors) {
        Member member = (Member) obj;

        if(memberService.checkUsername(member.getUsername())) {
            errors.rejectValue("username", "key", "이미 존재하는 아이디입니다.");
        }
    }
}
  • validator 패키지 추가 후 Validator 인터페이스를 구현
  • 검증이 필요한 Entity 클래스를 supports에 작성
  • validate에서 View -> Controller -> MemberValidator로 넘어온 member 객체를 통해 값의 검증을 시작
  • errors.rejectValue("에러 필드명", "키값", "키 값이 없을 때 사용할 메세지") 로 구성된다.

2. Controller 적용

@PostMapping("/join")
public String join(@Valid Member member, BindingResult bindingResult){
    memeberValidator.validate(member, bindingResult);

    if(bindingResult.hasErrors()) {
        return "/account/joinForm";
    }

    String encPwd = memberService.pwdEncoding(member.getPassword());
    member.setPassword(encPwd);

    memberService.join(member);

    return "redirect:/loginForm";
}
  • 컨트롤러에서 구현한 Validator에 Member와 BindingResult를 전달해준다.

3. View 적용

<form th:action="@{/join}" method="post" th:object="${member}">          
          <div class="form-floating mt-4">
            <input type="text" class="form-control" th:field="*{username}" th:classappend="${#fields.hasErrors('username')} ? 'is-invalid'" id="floatingInput" placeholder="Username">
            <label for="floatingInput">Username</label>
            <div th:if="${#fields.hasErrors('username')}" th:errors="*{username}" id="validationServer03Feedback" class="invalid-feedback text-start">
              Username Error
            </div>
          </div>
          <div class="form-floating">
            <input type="password" class="form-control mt-2" th:field="*{password}" th:classappend="${#fields.hasErrors('password')} ? 'is-invalid'" id="floatingPassword" placeholder="Password">
            <label for="floatingPassword">Password</label>
            <div th:if="${#fields.hasErrors('password')}" th:errors="*{password}" id="validationServer03Feedback" class="invalid-feedback text-start" style="margin-bottom: 8px;">
              Password Error
            </div>
          </div>
          <div class="form-floating">
            <input type="email" class="form-control" th:field="*{email}" th:classappend="${#fields.hasErrors('email')} ? 'is-invalid'" id="floatingPassword" placeholder="Email">
            <label for="floatingPassword">example@board.com</label>
            <div th:if="${#fields.hasErrors('email')}" th:errors="*{email}" id="validationServer03Feedback" class="invalid-feedback text-start" style="margin-top: 8px;">
              Email Error
            </div>
          </div>
      
          <div class="checkbox mb-3">
          </div>
          <button class="w-100 btn btn-lg btn-primary mt-2" type="submit">Get started!</button>
          <a type="button" class="w-100 btn btn-lg btn-primary mt-2" th:href="@{/}">exit</a>
        </form>
  • 타임리프의 th:if가 달린 3개의 div 태그에서 에러를 출력해준다.
  • th:if=${#fields.hasErrors('필드명')} : 에러가 발생한 경우 true 값을 반환하여 div태그를 표시해준다.
  • form 태그의 th:object="{member}" : GetMapping 때 전달받은 Member의 키 값을 넣어 전달 받은 객체
  • "*{username}" :  위 설명을 참고해서 Member.getUsername()을 View에서 사용할 수 있도록 한 값이다. -> ${member.username} 과 같다고 생각!
  • th:errors="*{password}" : password에 대한 에러 내용을 표시해준다.
728x90

문제 : 게시글 수정 작업 중 org.springframework.beans.NotReadablePropertyException 오류가 발생했다.


해결 : Thymeleaf에서 컨트롤러로 보내주는 파라미터 설정을 잘못하여 이를 고쳐줬다.

@Entity
@Data
@Table(name = "tb_board")
public class Board {

    @Id
    @GeneratedValue(strategy = GenerationType.IDENTITY)
    private Long id;

    @NotNull
    @Size(min = 2, max = 30, message = "제목은 2자 이상 30자 이하입니다.")
    private String title;

    @NotNull
    @Size(min = 1, message = "내용을 입력하세요.")
    private String content;

    @ManyToOne(targetEntity = Member.class, fetch = FetchType.LAZY)
    @JoinColumns({
            @JoinColumn(name = "writer", referencedColumnName = "username"),
            @JoinColumn(name = "writer_id", referencedColumnName = "id")
    })
    private Member member;
    private String image;
}
<form action="#" th:action="@{/board/form}" th:object="${board}" method="post">
	<input type="hidden" th:field="*{id}">
	<input type="hidden" th:field="*{member.id}">
	<input type="hidden" th:field="*{member.username}">
                .
                .
                .
	<div class="nav justify-content-end">
		<button type="submit" class="me-2 btn btn-primary">write</button>
	</div>
</form>
  • 타임리프에서 th:field="writer_id" 라고 작성해서 파라미터를 보내줬었는데, 참조하는 Entity의 필드명인 id를 적어주고 해결하였다.


'Web > Tymeleaf' 카테고리의 다른 글

[타임리프] Thymeleaf 정리  (0) 2021.12.18
728x90

스프링부트에서 타임리프(Thymeleaf)로 프로젝트를 진행 중 2번 이상 다시 찾아본 개념에 대해 정리해놓으려 합니다.

기본 타임리프 문서 : https://www.thymeleaf.org/doc/tutorials/2.1/usingthymeleaf.html#standard-htmlxml-comments


Tutorial: Using Thymeleaf

1 Introducing Thymeleaf 1.1 What is Thymeleaf? Thymeleaf is a Java library. It is an XML/XHTML/HTML5 template engine able to apply a set of transformations to template files in order to display data and/or text produced by your applications. It is better s

www.thymeleaf.org

수시로 업데이트!


1. 해당 조건이 만족할 때 컨텐츠 나타내기 (조건문 th:if)

<button class="btn btn-outline-secondary" th:if="${board.member.username == #httpServletRequest.remoteUser}" type="submit">삭제</button>
  • th:if문이 true로 나오면 컨텐츠 표시, 아니면 숨김
  • #httpServletRequest.remoteUser -> 현재 로그인한 유저 아이디
                <div id="uploadForm" th:if="${param.boardId == null}">
                    <div id="uploadElement">
                        <input id="uploadInput" type="file" class="btn btn-outline-primary" name="files" accept="image/*"
                            onchange="setThumbnail(event);" multiple /> <span style="font-size: small;"> * jpeg / png 타입의
                            이미지를
                            7개까지
                            등록해주세요.</span>
                    </div>
                    <a id="reset" class="mt-3 btn btn-danger" onclick="resetImg()">Reset</a>
                </div>
  • th:if문과 param(boardId가 url에 없을 때 div 태그가 보임)을 이용해서 컨텐츠를 보이고 안보이게 한다.
<div th:if="${menu} == 'home' or ${menu} == 'addAdmin'"></div>
  • 자바에서와 같이 || 나 && 사용 불가능
  • 대신 or 또는 and 키워드를 사용

2. 컨트롤러로 값 전달

<form th:if="${board.member.username == #httpServletRequest.remoteUser}" th:action="@{/board/delete}"
                    method="post">
    <input type="hidden" th:name="boardId" th:value="${board.id}">
    <button class="btn btn-outline-secondary" type="submit">delete</button>
</form>


    @PostMapping("/delete")
    public String boardDelete(Long boardId) {
        boardService.delete(boardId);

        return "redirect:/board/list";
    }
  • form 태그 안에 input 태그를 생성
  • input태그의 th:name으로 컨트롤러에 매핑할 변수값을 지정
  • 버튼 클릭 -> input태그의 th:value를 이용해서 값 제출

2-1. 체크박스 값 서버로 전달

            <form class="row g-3 justify-content-end" method="post" th:action="@{/board/myPost/delete}">
                <table class="table caption-top table-bordered table-hover">
                    <tbody>
                        <tr th:each="board : ${boardList}">
                            <td class="mt-5 text-center" scope="row">
                                <div class="checkbox">
                                    <input type="checkbox" name="boardIdList" th:value="${board.id}">
                                </div>
                            </td>
                            <td class="mt-5 text-center" scope="row" th:text="${board.id}">1</td>
                            <td><a th:text="${board.title}" th:href="@{/board/post(id=${board.id})}"
                                    style="text-decoration:none; color:black;">제목</a></td>
                            <td class="text-center" th:text="${#dates.format(board.createDate, 'yyyy/MM/dd HH:mm')}">작성일
                            </td>
                            <td class="text-center" th:text="${board.writer}">작성자</td>
                        </tr>
                    </tbody>
                </table>
		<button type="submit" class="btn btn-danger">Delete</button>
	</form>


    @PostMapping("/myPost/delete")
    public String boardDelete(@RequestParam(required = false) List<String> boardIdList) {
        if(boardIdList == null) return "redirect:/board/myPost";
        if(boardIdList.size() > 0) {
            for(int i = 0; i < boardIdList.size(); i ++) {
                boardService.temporaryDelete(Long.parseLong(boardIdList.get(i)));
            }
        }

        return "redirect:/board/myPost";
    }
  • form태그 안에 다음과 같이 체크 박스 name과 value를 지정. (th:each로 인해 게시글 개수만큼 체크박스 생성)
  • 체크박스에 체크하고 버튼으로 form을 제출하면 컨트롤러에 List 형태로 전달됨.

3. th:fragment 2개 이상 인자 전달

프로젝트 구조

<!-- Page -->
<nav th:replace="fragments/pagingCommon :: pagination(${pagination}, 'trash')"></nav>
  • 해당 코드는 board/trash 안에 작성된 페이징 관려 nav태그
  • th:replace="경로 :: 프래그먼트 명(${컨트롤러로부터 받은 객체 또는 모델명})
  • th:replace="경로 :: 프래그먼트 명('넘길 문자')"
  • trash는 4번에서 설명

컨트롤러에서 넘긴 객체

<body>
	<nav aria-label="Page navigation example" th:fragment="pagination(pagination, menu)">
		<ul class="pagination justify-content-center">
			<th:block th:with="start = ${pagination.startPage}, end = ${pagination.endPage}">
				<li class="page-item" th:classappend="${pagination.prev == false} ? 'disabled'">
					<a class="page-link" th:href="@{'/board/' + ${menu}(page=${start - 1}, range=${pagination.range - 1}, 
					searchText=${param.searchText})}">Previous</a>
				</li>

				<li class="page-item" th:classappend="${i == pagination.page} ? 'disabled'" th:if="${i != 0}"
					th:each="i : ${#numbers.sequence(start, end)}"><a class="page-link" href="#" th:href="@{'/board/' + ${menu}(page=${i}, 
					range=${pagination.range}, searchText=${param.searchText})}" th:text="${i}">1</a></li>

				<li class="page-item" th:classappend="${pagination.next == false} ? 'disabled'">
					<a class="page-link" th:href="@{'/board/'+ ${menu}(page=${end + 1}, range=${pagination.range + 1}, 
					searchText=${param.searchText})}" href="#">Next</a>
				</li>
			</th:block>
		</ul>
	</nav>
</body>

<페이징 관련 fragment 소스>

  • th:replace로 호출한 프레그먼트가 있는 html 파일에서 th:fragment="프리그먼트명(받은 값들)" 로 보내준다.

4. th:href 안에 변수 넣어 사용하기 (링크 컨트롤)

  • 페이징 소스를 사용하는 화면 곳곳마다 이동하는 링크는 다를테니 'list', 'myPost', 'trash' 같은 값을 replace할 때 인자로 보내서 th:href를 처리할 것이다.
  • 해당 처리를 하지 않은 코드는 th:href="@{/board/trash/(page=${start ...} ... )}" 
  • 처리 후 코드 : th:href="@{'/board/' + ${menu}(page=${start ...} ... )}"

5. 시큐리티 관련 메소드

사용을 위해 의존성 추가 (gradle)

implementation 'org.thymeleaf.extras:thymeleaf-extras-springsecurity5'


<a th:href="@{/loginForm}" class="btn btn-secondary fw-bolder me-4" sec:authorize="!isAuthenticated()">Login</a>
<form class="d-flex me-4" th:action="@{/logout}" sec:authorize="isAuthenticated()">
	<span class="text-white me-4 mt-2 fw-bolder" sec:authentication="name">사용자</span>
    <a th:href="@{/admin}" class="btn btn-danger" style="font-weight: bold" sec:authorize="hasRole('ROLE_ADMIN')">관리자 화면</a>
	<button th:href="@{/logout}" class="btn btn-secondary fw-bolder">Logout</button>
</form>
  • sec:authorize="isAuthenticated()  -> 로그인한 사용자에게 보여줌
  • sec:authentication="name"  -> 로그인한 사용자 이름을 표시
  • sec:authorize="hasRole('ROLE_ADMIN')" -> 권한이 ROLE_ADMIN인 사용자에게만 보여줌

참고, Authentication : 로그인, Authroization : 권한

6. Validator 관련 내용 (에러 내용 표시) + th:object, th:field, th:errors

<form th:action="@{/join}" method="post" th:object="${member}">          
          <div class="form-floating mt-4">
            <input type="text" class="form-control" th:field="*{username}" th:classappend="${#fields.hasErrors('username')} ? 'is-invalid'" id="floatingInput" placeholder="Username">
            <label for="floatingInput">Username</label>
            <div th:if="${#fields.hasErrors('username')}" th:errors="*{username}" id="validationServer03Feedback" class="invalid-feedback text-start">
              Username Error
            </div>
          </div>
          <div class="form-floating">
            <input type="password" class="form-control mt-2" th:field="*{password}" th:classappend="${#fields.hasErrors('password')} ? 'is-invalid'" id="floatingPassword" placeholder="Password">
            <label for="floatingPassword">Password</label>
            <div th:if="${#fields.hasErrors('password')}" th:errors="*{password}" id="validationServer03Feedback" class="invalid-feedback text-start" style="margin-bottom: 8px;">
              Password Error
            </div>
          </div>
          <div class="form-floating">
            <input type="email" class="form-control" th:field="*{email}" th:classappend="${#fields.hasErrors('email')} ? 'is-invalid'" id="floatingPassword" placeholder="Email">
            <label for="floatingPassword">example@board.com</label>
            <div th:if="${#fields.hasErrors('email')}" th:errors="*{email}" id="validationServer03Feedback" class="invalid-feedback text-start" style="margin-top: 8px;">
              Email Error
            </div>
          </div>
      
          <div class="checkbox mb-3">
          </div>
          <button class="w-100 btn btn-lg btn-primary mt-2" type="submit">Get started!</button>
          <a type="button" class="w-100 btn btn-lg btn-primary mt-2" th:href="@{/}">exit</a>
        </form>
  • form 태그 안에서 사용된 타임리프의 th:if가 달린 3개의 div 태그에서 에러를 출력해준다.
  • th:if=${#fields.hasErrors('필드명')} : 에러가 발생한 경우 true 값을 반환하여 div태그를 표시해준다.
  • form 태그의 th:object="{member}" : GetMapping 때 전달받은 Member의 키 값을 넣어 전달 받은 객체
  • th:field="*{username}" :  위 설명을 참고해서 Member.getUsername()을 View에서 사용할 수 있도록 한 값이다. -> ${member.username} 과 같다고 생각!
  • th:errors="*{password}" : password에 대한 에러 내용을 표시해준다.

7. th:block - th:with 로 변수 정의, th:each - #numbers.sequence(from, to), 링크 url

<body>
	<nav aria-label="Page navigation example" th:fragment="pagination(pagination)">
		<ul class="pagination justify-content-center">
			<th:block th:with="start = ${pagination.startPage}, end = ${pagination.endPage}">
				<li class="page-item" th:classappend="${pagination.prev == false} ? 'disabled'">
					<a class="page-link" th:href="@{/board/list(page=${start - 1}, range=${pagination.range - 1}, 
					searchText=${param.searchText})}">Previous</a>
				</li>

				<li class="page-item" th:classappend="${i == pagination.page} ? 'disabled'"
					th:each="i : ${#numbers.sequence(start, end)}"><a class="page-link" href="#" th:href="@{/board/list(page=${i}, 
					range=${pagination.range}, searchText=${param.searchText})}" th:text="${i}">1</a></li>

				<li class="page-item" th:classappend="${pagination.next == false} ? 'disabled'">
					<a class="page-link" th:href="@{/board/list(page=${end + 1}, range=${pagination.range + 1}, 
					searchText=${param.searchText})}" href="#">Next</a>
				</li>
			</th:block>
		</ul>
	</nav>
</body>
  • th:block 태그에 th:with로 사용할 변수에 값을 초기화해서 사용가능.
  • th:each에 #numbers.sequence(from, to)를 사용해서 from에서부터 to까지 i변수에 넣어 사용
  • th:href="@{/board/list(page=${end + 1}, range=${pagination.range + 1}" : board/list?page=...&range=...  

7.2 th:block th:with 조건문 사용

                        <tbody>
                            <th:block th:with="no = ${param.page != null} ? (${#numbers.formatInteger(param.page, 1)} - 1) * 10 : 0">
                                <tr th:each="member : ${memberList}">
                                    <td class="mt-5 text-center" scope="row">
                                        <div class="checkbox">
                                            <input type="checkbox" name="memberIdList" th:value="${member.id}">
                                        </div>
                                    </td>
                                                           .
                                                           .
                                                           .
                                </tr>
                            </th:block>
                        </tbody>
                    </table>
  • 삼항 연산자를 통해 특정 변수를 선언하고 값을 초기화한다.
  • #numbers.formatInteger(int형으로 변환할 변수, 자릿수) : no변수는 url에 page 파라미터가 없을 경우는 기본값 0
  • 이를 활용하면 파라미터의 값이 있을 때와 없을 때 변수값을 다르게 설정할 수 있다. 즉, 파라미터 값 유무에 따라 다르게 처리 할 수 있다.

8. 타임리프에서 날짜 형식 바꾸기

<td class="text-center" th:text="${#dates.format(board.createDate, 'yyyy/MM/dd HH:mm')}">작성일</td>

9. th:each 활용

index  현재 반복 인덱스 (0부터 시작)
count 현재 반복 인덱스 (1부터 시작)
size 총 개수
current 현재 요소
even 현재 요소가 짝수인지 여부 (index 기준)
odd 현재 요소가 홀수인지 여부 (index 기준)
first 현재 요소가 첫번째인지 여부
last 현재 요소가 마지막인지 여부
  • 사용방법
                            <tr th:each="member : ${memberList}">
                                <td class="text-center" th:text="${memberStat.count}">count</td>
                                <td class="text-center" th:text="${memberStat.index}">index</td>
                            </tr>

10. 타임리프 문자열 비교

<p th:text="${#strings.equals(member.role, 'ROLE_ADMIN') ? 'ADMIN' : 'USER'}">권한</p>
  • #strings.equals를 이용해 첫 인자와 두번째 인자가 같은지 체크할 수 있다.


+ Recent posts